
An essay in 3D resin printing
There have been a number of major developments for model railwayists in the last 10 years, and some of these have required much exercising of both brain and bank account.
DCC was such an adventure. Now 10 years on, it seems perfectly natural to take the throttle, dial up the required loco, start up the diesel engine, toot the horn and slowly open the throttle. I reckon the total additional investment over the last 10 years I put at about £3,000.
And now I am posed to start a second...and in many ways not dissimilar...adventure with 3D Resin Printing.
How might 3D change your approach to model railways? In essence, you become a designer and manufacturer, albeit a small scale one, as well as being a modeller using R-T-R, kits and self-made/scratch-built items..
Is it for me?
Let's start with who it isn't for.
1. If you find computers confusing, and don't take well to solving problems with them when things don't work as you think they should
2. You have already decided against DCC as it looks too complicated
3. You get easily frustrated, particularly with things that don't work as expected, or come with minimal instructions.
4. You don't have much time to devote to troubleshooting and problem solving
5. You don't like mess, or things that are intrinsically messy - very true with resin
6. You are being careful with your pennies, and don't want to invest in something that might not work for you
So who might then benefit from it?
1. if you are experiencing problems with eyesight or finger dexterity
2. if your accuracy with scalpel, steal rule, etc has always been suspect (!)
3. you need to speed-up your model making
4. your programme involves a high level of repetitive model making
5. Your modelling focus is an obscure prototype which doesn't have much, if any, trade support
6. You are not, by nature, a true scratch builder, and don't see yourself as a Guy Williams.
7. You are being careful with your pennies, and only want to buy what your are going to use (only need one lamp post but they come 4 in a pack at a cost of £20).
It is a mute question if you are already highly proficient at making models quickly and accurately, and have a well-equipped workbench that you can access on a regular basis, whether 3D would aid or hinder your progress.
I liken this to DCC, in that DCC was very frustrating, and there was lots of magic smoke in the early days from burnt-out chips. But now I have forgotten more that I knew, and it works, and works reliably.
3D printing is very similar. There is a significant investment in learning time, either attending a formal course or working from the excellent YouTube tutorials. Six months in, and I reckon I have spent around £2,500 on training, equipment and resin.
But the good news is that I now have quite a collection of unique, bespoke and accurate models that are steadily populating the layout.
Yesterday the six uniquely configured trackside relay cabinets (could have bought the Bachmann pack of 3 at £18.96, which are very good, but not actually Hall Royd) were placed in their correct locations, including one at the top of a flight of wooden steps. Today it is the turn of the monster telegraph poles, including one with a double pole configuration, one with an extended cross-bar, and two which are even taller than the others (at 12 cross-bars apiece, already large items) as the wires have to be raised to cross the public highway as it rises to cross the railway. These have been deliberately done in the style of Airfix/Dapol, so that some of the lesser runs won't look out-of-place. And this is the power of 3D printing.
The bad news is that I wrecked three printer screens in quick succession, and experienced a high level of model failures (a common experience - see YouTube or Facebook). The Swindon DMU lifting bracket took about 9 days to draw originally: its replacement after I had corrupted the file a couple of weeks ago, just 40 minutes. I was taught Fusion 360 on a course in early March, and I am still learning six months later. Things not yet mastered include drawing a curved cement asbestos roof for a Midland Railway-derived lamp hut, as used extensively by the LMS.
However, it also addictive! There is a sense of under-achievement and disappointment if the printer has not been running for a couple of days.
New or secondhand gear? I sourced my original gear from eBay, and there a surprising amount of 'as new' stuff which clearly never got taken out of the box. I deliberately went secondhand as I didn't know whether this was going to be something that would work out for me. You will also find gear described as fully working but with prominent resin residue. This is fairly typical of well-used gear, and this should not put you off getting a bargain. Although, as with the trains, there will also be pups out there.
Is it cheating?
It is suggested in some quarters that 3D printing does not require hours hunched over the work bench or lathe, and therefore are not real models.
At the end of the day, we are modelling, or perhaps parodying, real life. If we were to visit the Alstom or Hitachi design offices, we would be shocked if we found a classic drawing environment with T-squares and paper clipped to a board. All that we are doing is replicating what the real train builders (and heritage sector workshops) are now doing. In that sense, it is very prototypical!
Secondly, my school didn't do either wood or metal working, so I have never used a lathe and my domestic woodworking is questionable. My locomotives are a 50/50 mix of Ready-to-run and kit built, but nobody have ever suggested that using either to create my layout was in any way 'cheating'.
In the mid-80s I got my first job where the early Amstrad computers had a foothold and Visicalc was the new way of doing calculations, and I was somewhat resistant to the new technology. It came to a head when a task was split between a colleague and I, and I elected to process the data using paper, pen and calculator. It would be fair to say the end result in terms of time were close, except colleague Julie's was more accurate (!) and she was relaxed and had made the tea during the process whilst I had been at full stretch throughout the afternoon and was totally exhausted.
You are effectively making your own kits. Only you still have to find a plan, make corrections to the plan, draw it up on the computer, convert the computer drawing to a 3D virtual model, process the file in the slicing software and then finally ensure the printer is correctly set-up and able to print the said model! With something you have drawn yourself, there is a likelihood that the first rendering will have either failed in the printer or there is a design flaw (too short, long, high, low, etc.) and the design has to be modified.
This process requires skill, in the same way that someone trained in workshop practices has skills. They are different skills but one set of skills cannot be said to be superior or inferior to another set. The point is that whichever set of skills you have, you will end up with a model that is hopefully layout ready.
The food for thought is whether those guys at Pendon should have waited 60 or so years... :-)
Fad or serious tool?
It took me eight years to build the baseboards, lay the track, create the basic scenery and provide some of the buildings required. There was a two-year break due a catastrophic domestic event, after which it was difficult to rekindle the Modelling Mojo. I had intended for sometime to look more seriously at Computer Aided Design (CAD),as professionally I had been fairly proficient in the use of some of the advanced functionality in Excel, and had been the 'go to' person in the office for charts, graphs and maps for the publications.
With retirement came the question of how and when the layout might be completed. A comment at one of the recent Missenden Modellers sessions that people prefer to build models rather than operate their layouts brought the reply that the reason is that layout concerned is not much fun to operate, and this will be either because of poor design or build quality, or both.
This was the nudge I needed. I had to finish the layout, and address all those snagging issues which had been previously ignored.
For me, the big thing with 3D printing has the ability to design and make all the items that are highly specific to the line being modelled and are not available from the trade (although there are plenty of near misses).
I have also come to realise is that is a challenge to keep good stocks of all the Plastruct sections, strips and sheets required to sustain a concerted scratch-building effort. An audit of my Gibson straight brass wire this morning found that I am perilously short of all sizes except for .33. But with 3D, the appropriate sections are formed in the design, and all you need to have in stock is a bottle of resin.
My conclusion is that it has greatly speeded the production of the signature signal box, permanent way hut, hen houses, trackside cabinets and now the distinctive telegraph poles that marched along the Calder Valley route. There are ten poles required, of four types, and a variation! All have a dozen or more cross-bars. Modifying the Airfix/Dapol kit was not a possibility. Building them from brass would have been a epic adventure, taking weeks to compete. In between cutting the hedge, and other domestic duties, it took about eight hours to complete the drawings and design, and then they were left printing overnight (a 9 hour print job).
The telegraph poles are very distinctive and are dominant in photographs of the prototype. The critical bit here is the ability to complete the model to a reasonable standard in a relative time frame. Because I am not getting any younger, and I know that my next move will be into some form of retirement flat complex, the layout in its present - or in any - form will not be coming with me.
So it was actually a simple decision. Did I want to complete the layout 'soon' and have the pleasure of operating it with chums for the next two or three years, or was I going to be forced out of the house with an unfinished layout that had never been operated as intended?
A 3D wish list
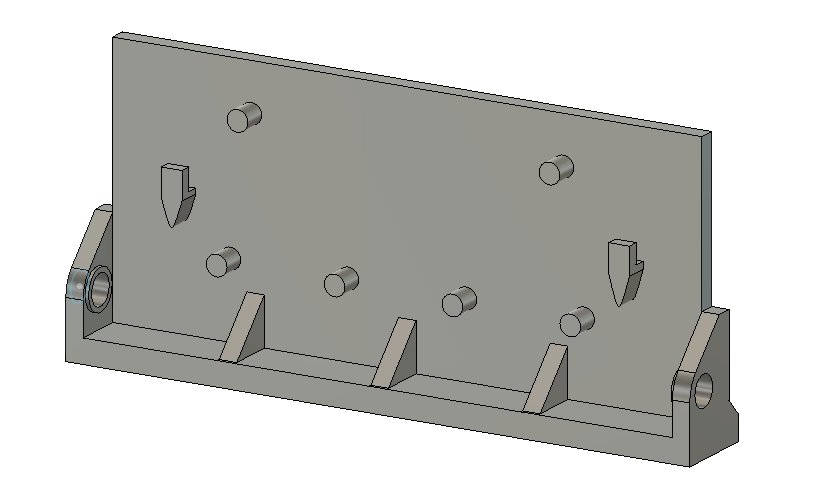
To set the scene, for some time I have been toying with the best way to produce two items. One is the large wooden LYR signal box at Hall Royd Junction, and the other the lifting bracket that featured on all Swindon DMU designs, and in particular on the Class 124.
Various schemes have been examined for the signal box. Scratch building seemed the most obvious route, but would require careful work. Etches are available for the window frames (as per the brick-based Hebden Bridge), which would ease the process.
I was very taken with an article in issue 209 of the 'Model Railway Jounal' in which Robin Whittle described how he employed York Modelmaking (YM) to produce a set of 2D laser-cut sides and overlays for his model of Lawrence Hill Junction Signal Box.
I had a plan of for my box which I had drawn in Paintshop Pro and made an approach to YM. I had seen that YM could accept plans in PDF format, and thought they might be able to convert my plan accordingly. And then the first snag was encountered. My drawing was in a raster format (so composed of pixels), while YM required a file formed of vector graphics (composed of paths or lines). So converting either into a PDF didn't alter the underlying formatting.
The YM team could re-draw my raster drawing, but there was a lengthy queue, and the total cost would be in the region of £200.
The proverb: "Give a man a fish and he’ll eat for a day. Teach a man to fish and he’ll eat for a lifetime" was fresh in my mind from a visit to Oxford Services (it's on the tiled walling in the Harry Ramsden franchise).
If I was to adopt this approach I would need to:
1. learn to use Computer Aided Design (CAD) software
2. redraw my raster drawing
3. convert the drawing to 3D
4. find or acquire the printing technology
Whilst I had used computers extensive in my working life, I had never worked in a engineering or design environment, so had no exposure to CAD-type programmes. There was also the question of whether I wanted to go down the 2D or 3D route (so cutting out parts from a flat sheet, or printing fully formed models with three dimensions).
I decided that whilst I had previously mastered software in a home-learning process, this was sufficiently outside my comfort zone that I felt I needed a night school or similar environment too kick start the process. I knew of the Missenden Modellers courses, and had checked them out and seen there was a design course. The only problem was that the residential slots were all taken, but there were still slots for non-residents.
![]()
The two and a quarter day course is run by Justin Newitt of Rumney Models (https://website.rumneymodels.co.uk/). Originally the course looked at both 2- and 3D modelling, but I think - rightly - Justin has decided it would better to focus on just one area, and chose 3D as being the more difficult to master (so needing a tutored environment) but also likely to be the more rewarding one for attendees wanting to produce models using a computer. Course details can be found here.
Justin has adopted Fusin 360 as the drawing/design software, and there is a free educational/hobby license available. Worth noting that the paid-for license relates to the design of models, and whether you renew your subscription or not, you are free to print an indefinite number of models for your own use thereafter. Fusion 360 is Cloud-based and so they can obviously police any breaches of the license by simply terminating the account. Just something to consider.
I booked myself a non-residential slot on the 3D course 4 - 6 March 2022 (it is just down the road from me!). The pre-course tasks were to download and install the Fusion software, and to work through the official Fusion Work Sheets 0, 2 and 4, the latter two dealing with Sketching and Modelling.
I personally found the Fusion material difficult to work through, and was not able to complete any of the projects detailed. My primary problem was finding (and this applies to all new software I get involved with) and mastering the indexing and drop down menus.
In retrospect I would highly recommend two YouTube channels for the basic groundings they provide.
Paul McWhorter's 'Learn Fusion 360 or Die Trying' starts at the beginning, and you can acquire skills in simple steps. The programme starts here.
The other channel (and the one I started with after abandoning the Fusion Introductory materials) was '3D Drawing for Model Railways'. This programme starts by creating some simple items such as a skip or trackside relay cabinet. It rapidly progresses to brick walls, slate roofs and a wonderful library of modern on-track equipment.
The Missenden course involves the creation of a wagon buffer. This is a surprisingly complex item, and its creation involves a raft of skills. It was fully immersive, and my head was whizzing as I drove home on the Sunday afternoon. I had also witnessed the miracle of models forming in front of my very own eyes, and was amazed at the large libraries of free downloads of wagons, loco bodies and buildings.
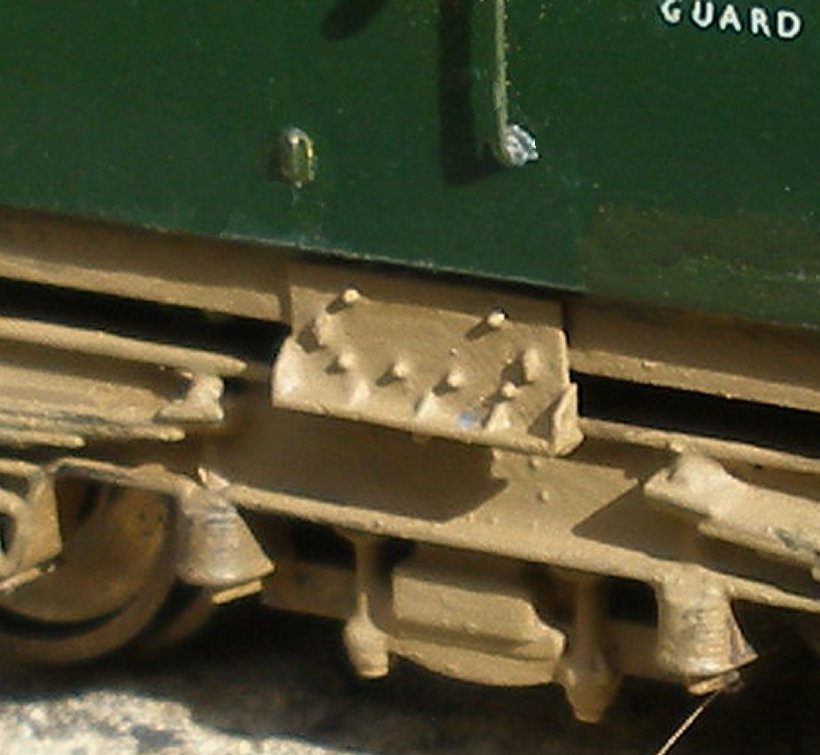
The rest of March was spent trying to fashion a lifting bracket.The photos below are the screen grab from Fusion 360, and the second shows the printed result attached to the 4mm scale underframe (sorry about the painting: I blame Humbrol :-) ).
This file was now ready for printing. In my naivety I had assumed the country was covered by a network of 3D printer shops, in the same way that there are small printing shops in every time centre. There are 3D printer shops but they are widely dispersed, and it was becoming apparent that any effective prototyping of designs would be a long drawn out process.
I therefore decided to bight the bullet, and buy my own printer. I had already decided I would go for resin. The pros are the greater detail that can be achieved; the bad news is that it is quite a messy technology and care is needed to avoid print failures.
It was envisaged that the Hall Royd Junction signal box body would be printed as a four-sided box, and then the roof as a separate item that could be lifted off for both production reasons and also for access to the interior.
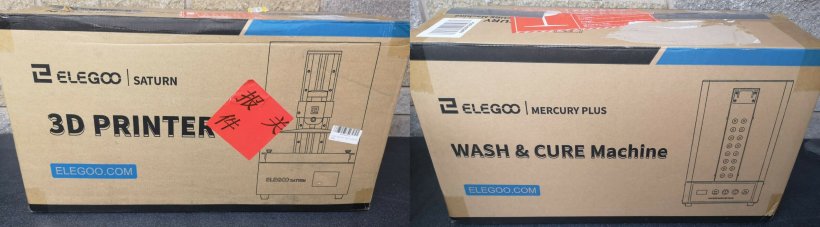
This was going to require a large print plate for this, and I chose the Elegoo Saturn as a larger machine in the home printing market at around the £400 price mark (compared to a low-end business machine starting at around £1,900).
As this was still a tentative toe in the market, I sought an unused second hand machine on eBay and was able to find such a machine, and an accompanying Elegoo Mars Wash-and-Cure station for £399.
These notes are being drafted on 8 June 2022, some nine weeks after the boxes arrived.
Rather than a blow-by-blow account, I want to focus on the lessons learned, and have grouped them by topic.
Overview
There are three steps to printing a model:
1. drawing the model in some form of CAD software (in this case Fusion 360)
2. creating the scaffolding to support the model as it forms on the plate (Chitubox is supplied with the Elegoo printer for installation on your computer)
3. plugging the memory stick into the printer and pushing print
Fusion 360
Download the Fusion 360 under the education/hobbyist license.
My laptop was in the lower range for the Fusion minimum specs and it worked.
Slicing with Chitubox
This is another skill-set required. Again, it requires much practice. The Facebook groups reveal people struggling to get the settings right for their machine, models, environment, etc. Don't believe anyone who claims they have settings guaranteed to work every time! I have now settled on a relatively large raft (base) and greatly sowed the lift times (so extending the overall print time). This will mean nothing to people still to take the first step, but it is slicing that largely determines the success or failure of the model.
Printers & Cure-and-Wash
Biggest initial problem with the Elegoo Saturn printer? Keeping resin off the screen.
Nine weeks into the process and I was on my fourth screen! Thankfully I the 'burn' rate has now slowed considerably, but developing your workshop pratcics is part of the steep learning curve.
For those who have not yet stepped over the threshold, the printer consists of a UV light source, which sits below a polarized screen. A tray with a clear plastic bottom (the FEP) sits above this screen and holds the resin. Finally there is a vertical metal column with a rotating screw thread on which the printing plate travels up and down.
The printing plate descends into the tray until it is just above the FEP sheets. The UV lights then switch on, and cure a single layer of resin. At this point the layer is attached to both the metal printing plate AND the FEP sheet below. The lights switch off, and the plate starts winching its way northwards. This is the critical moment, as the plate and the FEP battle it out for ownership of the embryonic model. If the plate wins, all is good; if the FEP wins you have a print failure. As each model will typically have, say, up to 1,500 there are plenty of opportunities for failures.
And this is why getting the hang of settings in the slicing software is key to the whole thing.
Resin on the screen
How could such a thing happen? Surprisingly easily. If there is ever a piece of solid resin (usually loose scaffolding) in the tank when you start a print, the plate will push this shrapnel through the FEP and so puncture it.
The obvious thing to do would be to fit a screen protector, and these are available from Amazon.
People do report success at removing resin from the plate. The first thing is NOT to use the metal scraper! I did and this brought off the polarized layer.
The sensible thing to do is check out the YouTube videos.
The three options seem to be 1. bathe the screen gently with IPA, gently cleaning away as the process continues 2. warm the screen with hot water applied to a sponge and gentle sponge and 3. remove the polarized layer altogether and fit a replacement sheet as sold for school laboratories. None of these worked for me :-)
None of these worked for me. My current solution is to heat the set resin with the hair dryer whilst simultaneously scraping with the PLASTIC scraper. The screen is not perfect, but it functions correctly.
The replacement screens cost £60-£70. The second screen got smeared with resin that had pooled on the underside of the tray. The third actually failed and was replaced free-of-charge by Elegoo.
The Elegoo support is very good: send then an email with photos of the failure and they will advise. When buy through Amazon you buying directly from Elegoo. The Amazon reference number then unlocks the Elegoo support.
Now a note about the tank cleaning process. his function will be found under the Tools tab on the printer. Basically it fires of all the lights which cure a flat sheet on the bottom of the tank, and which 'captures' all the failed bits of print. I thought this could only be removed by removing and draining the tray. In fact, it is possible to go fishing to find the edge of the cured sheet with the yellow plastic scraper, and then pull it out of the loaded tank still in situ on the printer.
My first printer came with a removable spring steel sheet. Basically you stick a 3M magnetic adhesive pad to the printing head, and then the steel sheet sits on that. A handy tab makes very easy to separate the sheet from the head,and then you can flex the sheet to remove the model.
Washing
I had a problem with the Mars Cure-and-Wash station in that very quickly debris built up under the rotor at the bottom of the tank. My work around was to remove the rotor (need a Tork screw driver) and crudely cut a washer from a piece of 20 thou Plasticard. This allowed the rotor to still locate on the spigot in the base of the tank but at a greater height from the base. This has worked quite well, the only problem now is that it jambs on larger pieces, but there you go :-).
The other issue is that it has two settings: a light bulb for the UV light, and two circular arrows for the washing mode. You do need to make sure that the washer is selected when the tank is placed in the device. I managed to place the item for washing in the tank, placed on the base and then bathed in UV light. Disaster!! My recommendation to Elegoo would be to have it set up so that the washing cycle is the default when the machine is powered up.
And a note about IPA. You will need a lot if using the regular resins, and will need a process for filtering and cleaning IPA. I stand the contaminated IPA in a plastic bottle on a sunny window sill so allow the resin to slowly settle out and then carefully pour the clearer IPA forming at the top of the bottle through a coffee filter placed in a funnel. Over a few weeks of repeating this process you will be left with about an inch of resin at the bottom of the bottle which can then be put in the landfill wheelie (I know, poor old planet).
29 August 2022

Copyright J K Wallace, t/a 'Hall Royd Junction' 2013-2023 email: Hall Royd Junction
7 Portobello Close, Chesham, Bucks. HP5 2PL, UK
tel: +44 (0)7513 412880