
Hall Royd Junction: the prototype - 3
Copyright: J K Wallace, all rights reserved 2013
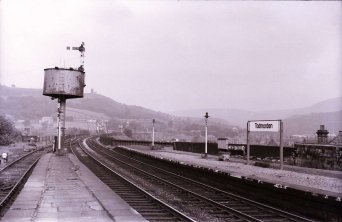
However the loop round the back of Platform 2 is still in situ with its connection to the main line intact. However the loop-side bag on the water tower, which was latterly used to water the Burnley-bound Fairburn tank after it had deposited its train in the bay.
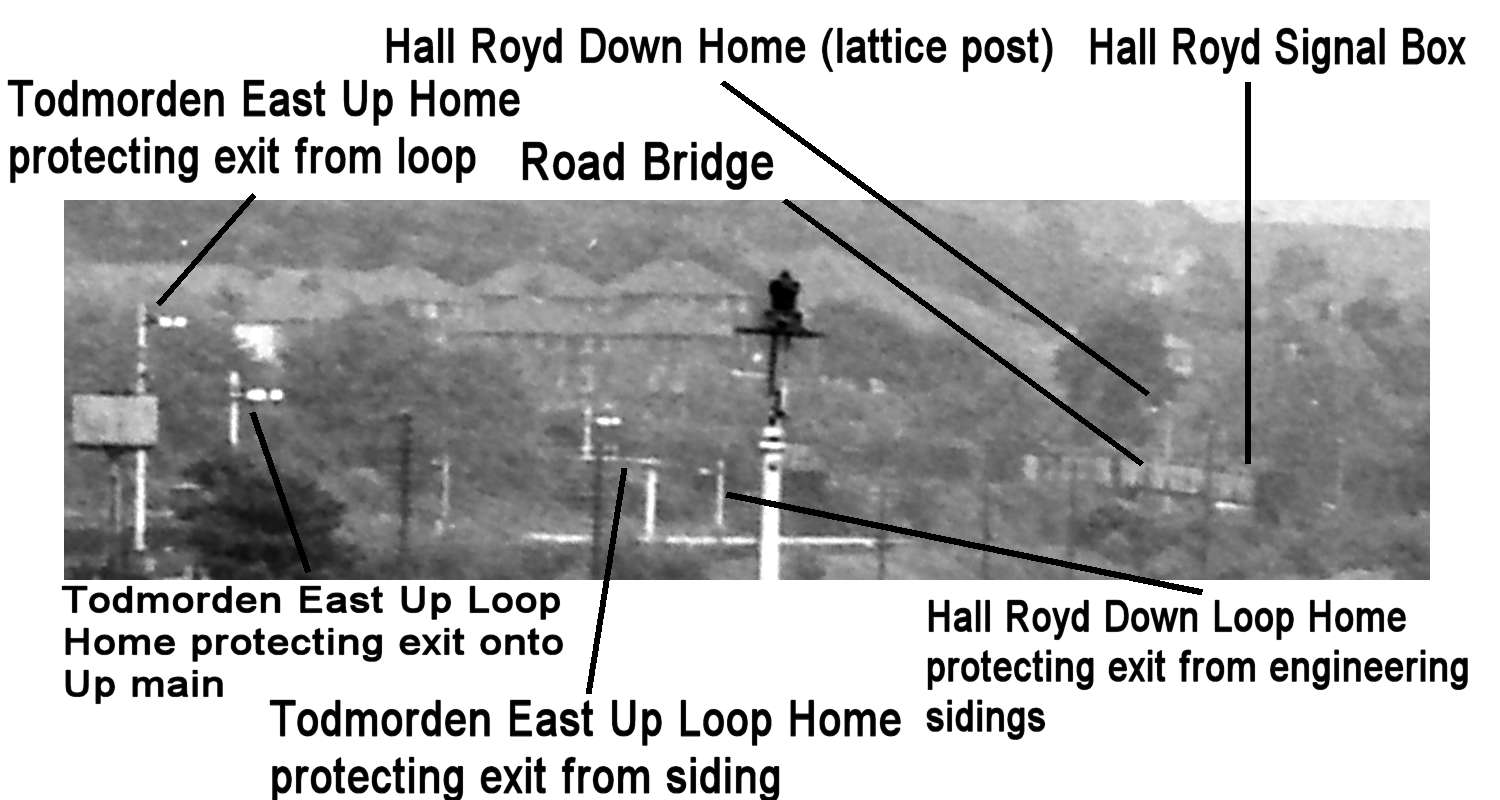
The two up signals controlling egress from the up goods loop have lost their distant arms but that the bracket signal protecting the short siding that joined the Up loop half way along is still in situ. All of these are the later BR replacements, all originally being LYR signals. The water tank is still in situ, although without its bags. Study of photos prior to the end of steam suggest that the bags were removed sometime earlier from the tanks in the locality, the water tanks having been out of use for some time. In the distance can be seen Hall Royd Bridge, and beyond it Hall Royd's tall down home on a lattice post.
Copyright: J K Wallace, all rights reserved 2013
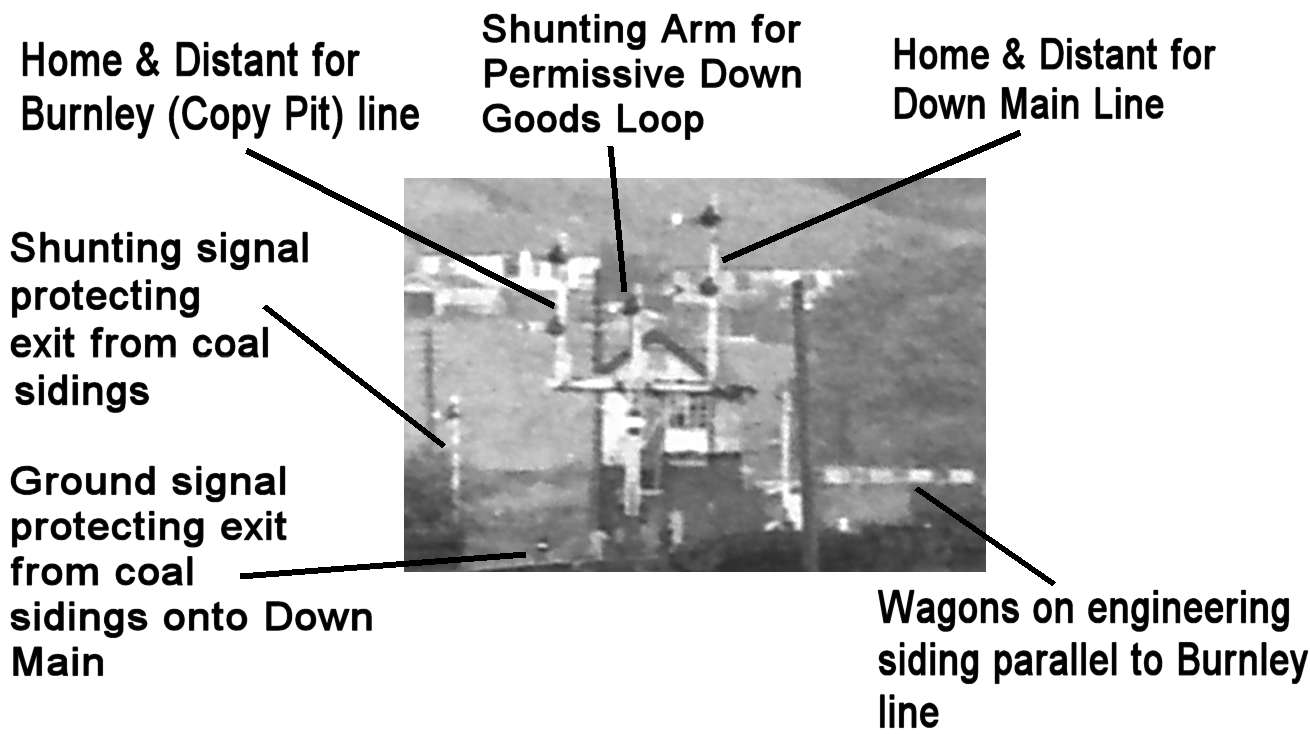
The trident retained its L&YR post to the end - although the detail is hazy, the distinguishing features are the greater width than the LMS standard post, and the cast iron brackets can just be made out. There's a home and distant arm on the left doll for the Stansfield Hall chord (now in the process of being restored); a short arm on the middle doll controlling access to the down permissive goods loop; and the taller right hand doll with its home and distant for the Main down line.
On the full size photograph the shunting arm controlling the exit from the coal sidings behind and to the left of Todmorden East signal box: these serviced the coal drops at the north eastern corner of the viaduct. The retaining walls that formed the coal drops are still visible.
Copyright: J K Wallace, all rights reserved 2013
For a current view of Hall Royd Junction, here is a video clip filmed from Todmorden to Millwood Tunnel, and from Millwood Tunnel to Todmorden on 19 April 2013. The journey starts on Platform 2 on Todmorden Station, passes out onto the viaduct looking north, and then past the end of the chord to the Burnley line showing the cleared trackbed and the wrecked headshunt of the engineering sidings and loop before passing the GSM-R base station which now cuts the sidings immediately west of Hall Royd Road bridge. The Burnley line sweeps in and then joins the main line before entering Millwood Tunnel.
In the reverse direction there is a spot of white out as the camera adjusts for the sudden increase in light as the train exits the tunnel, and then the train sweeps across the viaduct to stop on Platform 1 at Todmorden.
Whilst photos of Hall Royd Junction from the east might be relatively scarce, remarkably YouTube turns up trumps. The Cotton Mill Express was filmed running through Todmorden from Cinder Hill in the spring of 2008 pulled by BR 4MT 2-6-0 76079. The clip shows the train passing Cinderhill Miils before entering Castle Hill Tunnel. It then emerges, passing Castle Hill Primary School on the left and then immediately afterward Milepost 20. It then enters Millwood Tunnel (with Pheonix Street immediately above the mouth), before finally emerging at Hall Royd Junction and taking the right hand fork bound for Copy Pit.
The Cotton Mill Express was run by Past Time Rail, the left Manchester Victoria and travelled via Stalybridge into the Pennines for the tough slog up to Diggle, and via the long Standedge Tunnel, down into Huddersfield. From here it turned north and west, to head up through the glorious Calder Valley, passing former textile towns such as Sowerby Bridge, Hebden Bridge and Todmorden, en route to Burnley and Blackburn, via the spectacular and testing ‘Copy Pit’ route. After taking water at Blackburn the CME returned to Manchester Victoria via Darwen and Bolton. Details of the 2008 excursion schedule with photos are on the Cotton Mills Website.
76079 was built at Horwich in 1957 and spent its early career at Sutton Oak in St Helens. In May 1964 it was overhauled at Eastleigh works and then spent a short time running in on the trains from Waterloo, and in 1965 it was working coal trains along the North Wales coast. Wigan Springs Branch in June 1967 was its next base from where it was withdrawn in late 1967, and arrived at Barry scrapyard in September 1968.
In the early 1970's Steamport Southport was on the look out for a BR loco to enhance its then predominantly industrial fleet. Gordon Walker as Chairman of Steamport assemble a group of local investors to buy 76079 for Steamport, who used an off-the-shelf company with the unlikely name 'Frogstone'. In due course the deal was down and it arrived in Southport. Having raised the purchase money there was nothing in the kitty for restoration. It was during this period I had a very short relationship with 76079, spending an afternoon rubbing down a coupling rod and applying a coat of orange primer to the tender coal space.
Eventually Derek Foster, then a member of the Liverpool Locomotive Preservation Society - owners of industrials 'Lucy' and 'Efficient' - bought the loco and funded the restoration which was carried out in Liverpool. It moved directly to the East Lancashire Railway in 1990, and then the Llangollen Railway in 1992 (or early 1993) but returned to the ELR for the 25th Anniversary of the End of BR Steam Gala in August 1993. It continued to be based at Llangollen until 1998 when it was bought by Duncan Bray and transferred to the Churnet Valley Railway. Remained there only a short time until it was bought by Ian Riley and moved back to the ELR. In a shock move (or so the enthusiast railway press claimed at the time), it was sold in working order and moved to the North Yorkshire Moors. However a broken cylinder has seen the loco taken out of traffic.

Copyright J K Wallace, t/a 'Hall Royd Junction' 2013-2023 email: Hall Royd Junction
7 Portobello Close, Chesham, Bucks. HP5 2PL, UK
tel: +44 (0)7513 412880