
Todmorden East
Todmorden East Junction was on top of an embankment, immediately after the viaduct which cuts through the centre of Todmorden. Consequently photos of the actual junction have to be taken either 'trackside' or from the high ground behind the station. The first shot is an unusual 'trackside' view showing Todmorden East Junction on 23 August 1967 with a hybrid DMU set made up of Class 101 Driving Motor Brake 50256, and two Class 110 trailers. In the foreground is the exit from the Up Loop, which was entered beyond Hall Royd Road bridge. The exit signal and the short headshunt are clearly visible. The DMU is signalled for the Down Main. In the background are two mineral wagons are standing on the coal drops. The pair of guys ropes steady the telegraph pole that stood just behind the signal box, the bottom of the handrail and steps appear on the far right of the image. Not the small brick structure, possibly a shelter for workers on the coal drops on what would have been a very exposed location.

Copyright J K Wallace c. 2019, all rights reserved.
Eric F Bentley was based in Tottington, and travelled extensively in the region with his camera in the late 60s. Two of his photographs featured Todmorden East Junction from the top of the hill behind Todmorden Station.
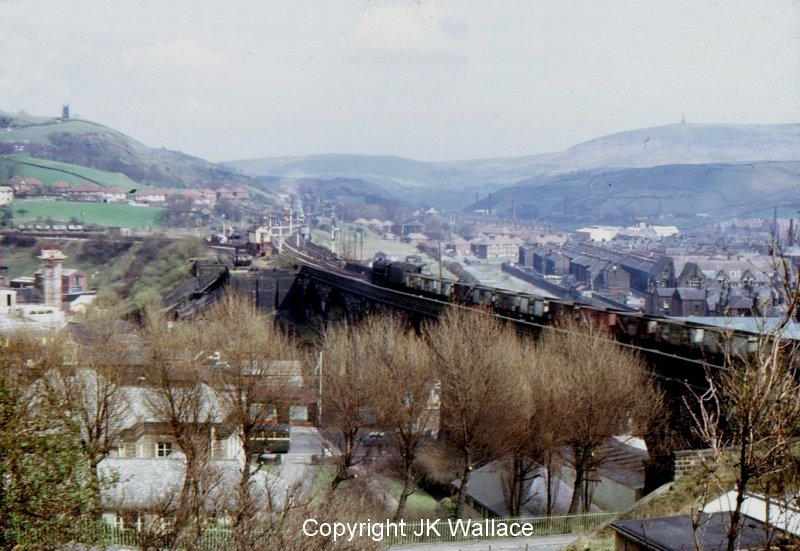
Photograph Eric F Bentley, Copyright J K Wallace c. 2014, all rights reserved.
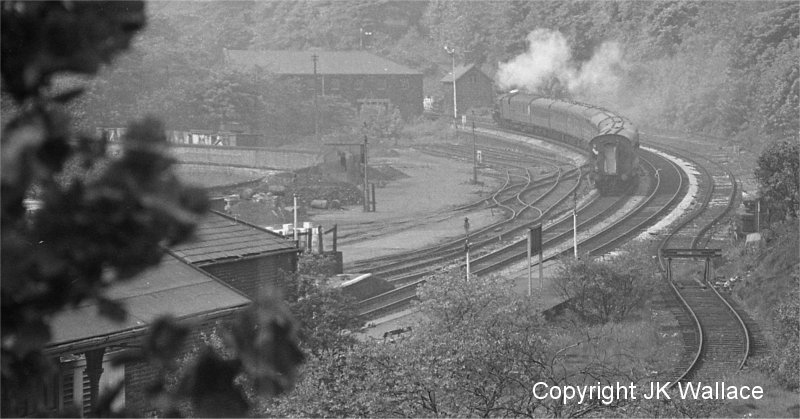
Eric Bentley's first photograph shows the Newcastle - Red Bank empty newspaper vans passing Todmorden East Junction at 17:30 hrs on Sunday 3 April 1966. The train left Newcastle at around 11.50 hrs, and is being hauled by Class 45 D81. At this time, all the elements of the original layout are still in place, but within months - if not weeks - some features would be removed. The coal drops and trackage are in place to the left of the signal box, complete with a modern hopper (for the period) on the drops. The Up goods loop (to the right of the train) is in situ, along with the siding that can be seen emerging to the right of the water tank. At the end of this siding there are two vehicles. Contempranious cine film fleetingly shows these carriages at the end of the siding and they appear to be a pair of LMS Period II vehicles. The bracket signal protecting the exit from the siding onto the loop can be seen. Just the other side of Hall Royd Road bridge can be seen a signal post with a home and distant arm, the main line post of the bracket controlling entry to the loop. Very shortly after the photo was taken, both the bracket and the gallows signal at the mouth of Millwood Tunnel were removed and replaced by the colour light signal at the opposite end of Millwood Tunnel, which sported two feathers, one for the East Lancs and one for the loop. From this location Eric was able to swing round and catch the train powering out of Todmorden.
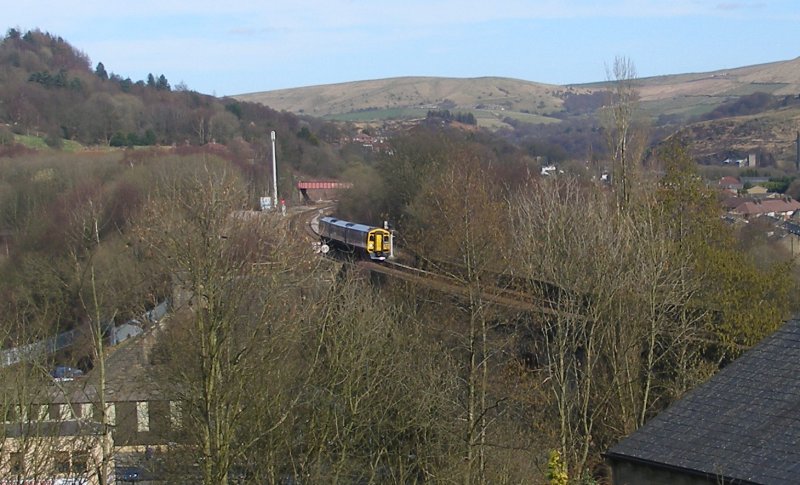
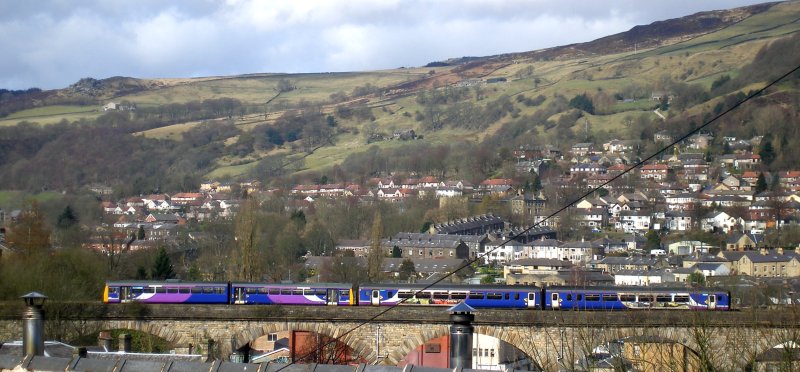
Todmorden Viaduct Friday 25 March 2016 with the 2M50 13:51 Leeds to Rochdale service arriving at Todmorden at 14:47, and running to time. Although similar to the earlier view, this is taken from a slightly higher vantage point to avoid the heavy tree growth. The original image was taken where Doghouse Lane becomes Ridge Road. A further complication is that the modern Buckley Wood Bottom also provides fresh hedging along its kerbside, so preventing a direct replication of Eric's second shot taken from this location and showing D81 powering out of Todmorden (see below).
Copyright JK Wallace, all rights reserved.
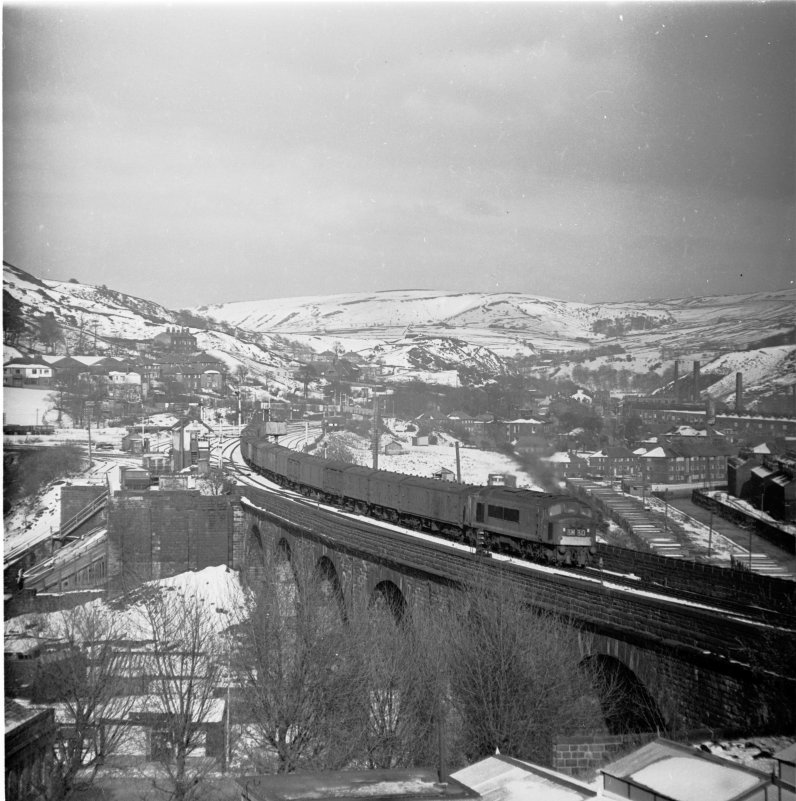
Todmorden Viaduct seen from above the station with Stanier Black 5 44803 heading eastwards with an empty mineral train purportedly in August 1968. The train is signalled to run straight through on the down Main Line, and the Home signal at Hall Royd Junction is also cleared.
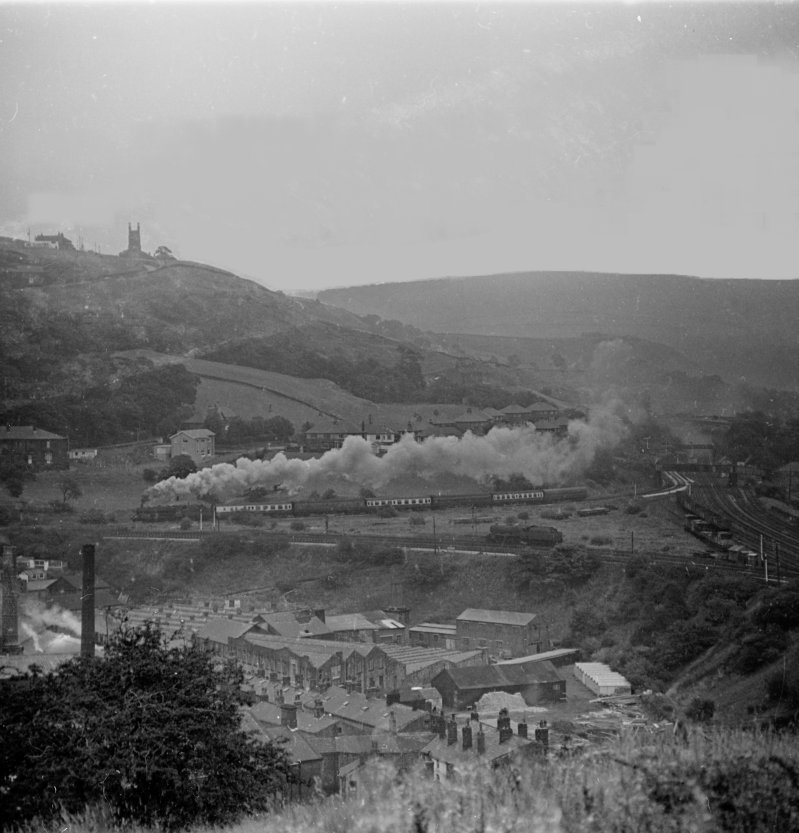
Photograph Eric F Bentley, Copyright J K Wallace c. 2014, all rights reserved.
Eric F Bentley snapped this scene some 19 months later showing Hall Royd Junction - Stansfield Hall - Todmorden East with a Halifax – Blackpool North relief at 9.25 on Saturday 16 September 1967 with a Black 5 hauling six BR Mark 1 carriages. Despite the train only having just cleared Hall Royd, already the signals are pulled off for a Down L&Y train.
There is much to note in this photograph. Firstly, the train only has one brake vehicle, which is marshalled at the front. By late 1967 trains are taking on a pie-bald appearance with the newly-painted blue/grey coaches being gaily mixed in with maroon vehicles, although at least in this instance they alternate. DMU sets at this time were also seeing blue vehicles randomly mixed in with green.
There is an 8F banker provided by Rose Grove sitting in its siding; although it wont be required to bank six coaches. There are wagons 'spotted' along one of the sidings paralleling the East Lancs line, whilst the sidings alongside the Down L&Y loop appear to have a raft of BR mineral wagons and a short freight formation with guard's van.
At this stage, in late 1967, almost all the infrastructure is in place, with the up-loop and accompanying siding still in place on the far right of the photograph. However the bracket signal that stood on the Leeds-side of Hall Royd Road bridge has already been removed, replaced by a feather on the newly installed colour-light junction signal at the eastern mouth of Millwood Tunnel. Also missing as a consequence - although it would not have been visible in the this photo due to the smoke billowing out of Millwood Tunnel - is the gallows junction signal. At the same time the single slip that facilitated reversals at Hall Royd Junction has been simplified and is now a diamond crossing.
Due to recent ballasting on the East Lancs line, their alignment under Hall Royd Road bridge is very apparent. This emphasises the tightness of the curve at this point, with the five tracks literally being squeezed under the road bridge. The tightness here is in contrast to the main girder of the bridge itself which spans five tracks, and is a lengthy structure without intermediate support. This highlights the difficulty that the L&YR had in increasing capacity on its main line, having to squeeze loops into locations that were less than deal. Having passed under Hall Royd Road bridge, the East Lancs tracks curve significantly to the north before swinging south again to join the L&Y main line. The bulge so created allowed a water tank to be provided at the exit from the Down loop. It will be interesting to see whether Network Rail attempts to realign Hall Royd some time in the future now that the remains of the Down loop have been removed.
As recorded elsewhere, the junction with the East Lancs was originally at the site of the road bridge, with the road crossing to the east of the road bridge on a level crossing. Also at this location was a private siding for the Fielden family, which, once removed, allowed for the creation of the five track layout shown.
Finally, this view is no longer possible due to the dramatic tree growth on the railway-owned land inside the triangle. And, of course, since this photograph was taken, the track in the foreground running from Todmorden East to Stansfield Hall Junction has been closed, lifted and then relaid. Opening, however, awaits (23 June 2014) completion of the interlocking at Stansfield Hall to facilitate workings towards Todmorden (workings the other way have already occurred) and the availability of trains to provide the service, currently slated for December 2014.
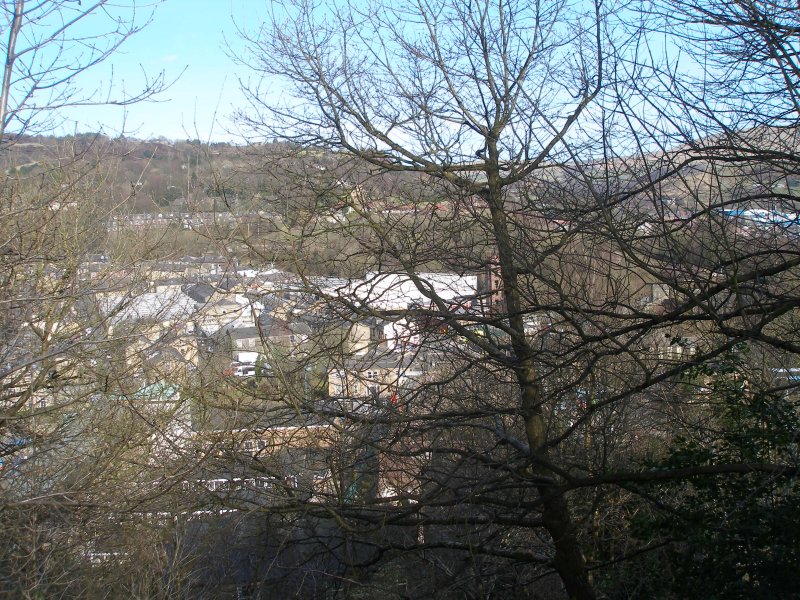
Todmorden triangle from above Lover's Walk, Todmorden 25 March 2016. A variety of positions were tried, above and below this particular location, but none were clear of trees.
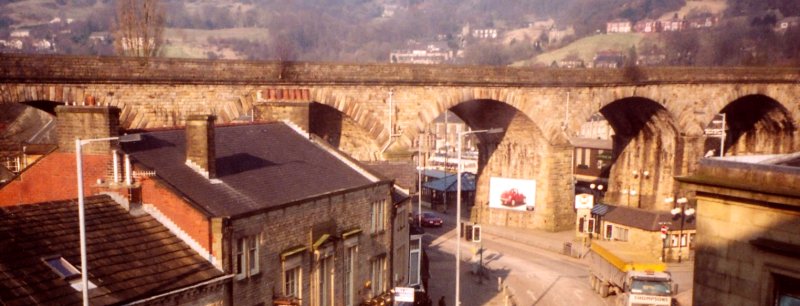
Todmorden Viaduct photographed from the upper floor of the Town Hall c. 2005.
Todmorden Viaduct looking from the south 24 March 2016.
Photograph Eric F Bentley, Copyright J K Wallace c. 2016, all rights reserved.
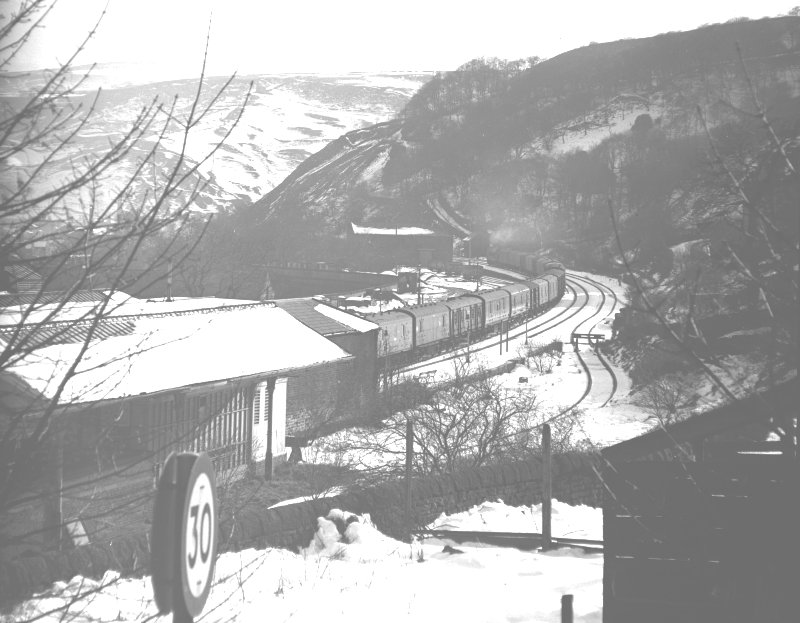
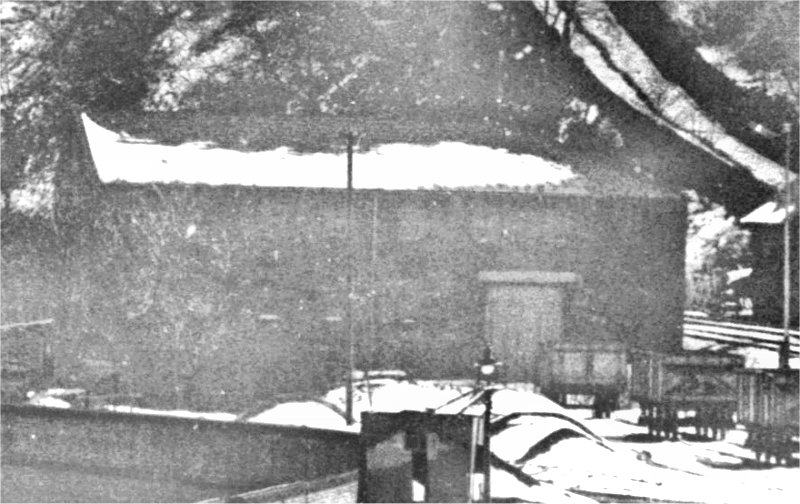
Having photographed the Red Bank empty vans approaching Todmorden, Eric Bentley then swung round and caught the train powering away from the station. There are a number of points of interest, as the photograph captures a number of features not normally seen. The 30 mph sign appears at the bottom of the image - today this is slightly further up the hillside as Buckley Wood Bottom now heads off to the right.
In early 1966 Todmorden West cabin has been removed - it was located on the right beyond the buffer stop now breaking the loop that passed behind the station. Whether the track beyond the buffer stop beyond the buffer stop was still accessible at this time is not known. Note also the isolated buffer stop behind the station buildings. The light covering of snow helps identify the extant tracks very well.
This is - so far - the only published photograph showing the rear of the two structures on the Down platform. Modellers need to note that they are of differing widths. The structure covering the subway stairs has a wooden screen with a single window inserted into it, but appears to be open to the rear where the stairs actually rise. Note also the louvered windows to the right of the wind screen, suggesting toilets. Note also the roof lights over the stairs, which look very similar to the glazing on the other platform. The Down waiting room appears to have a brick rear wall, which in turn does not appear to have any windows. The front of this building was classic L&Y wooden construction.
Looking at the middle distance, the photo also captures the station side of the warehouse that was located at right angles to the tracks at the end of the goods yard. The other side of this building is caught in various shots of Dobroyd Crossing. Crucially this shows it was standing in April 1966. It can also be seen that one of the goods yard tracks entered the building.
The yard is still be used for the unloading of coal. Eric's other shot shows coal hoppers on the drops at the other end of the station, so these two photos seem to suggest that coal was king, and dominated all other traffics at Todmorden at this time.There are three wagons 'spotted' along one of the middle roads, and then a rake of 12 ton minerals at the far end of the siding that runs alongside the top of the Great Wall. Coal from this operation can still picked up off the ground here.
Although very much in shadow, the detail extracted below suggests two rows of windows on the side of the warehouse facing the goods yard.
Finally, the rear of the two structures on the Down platform also deserve closer study.
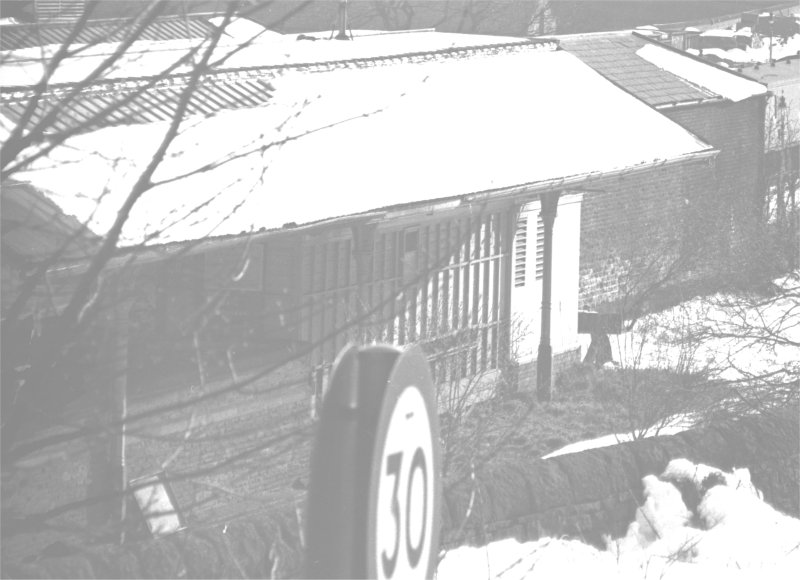
What appears to be a glazed area is, in fact, a wooden frame, with planking affixed on the platform side. There appears to be a small window in the centre of the screen. The difference in widths of the two structures is apparent, and the rear wall of the otherwise wooden waiting room appears to be made of dressed stone.
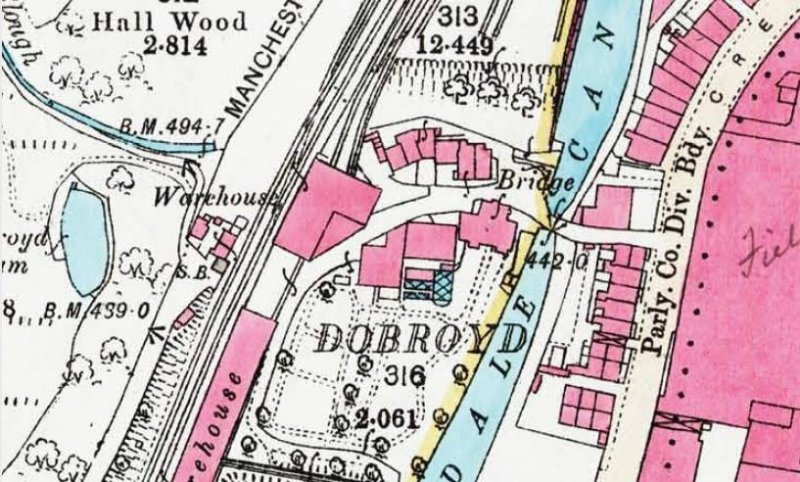
I am grateful to Russell Taylor-Riley for sourcing the map below that shows the L-shaped floor plan of the warehouse at Dobroyd. Russell suggests that the triangle section might have been a canopy for road vehicles. Not the second warehouse parallel to the railway and south of the crossing.
Finally, Eric Bentley returned during the Summer and caught 1X55 Riddel & Co excursion from Bradford Exchange – Blackpool North passing Todmorden at 09.45 on Saturday 4 June 1966.
Photograph Eric F Bentley, Copyright J K Wallace c. 2016, all rights reserved.

Copyright J K Wallace, t/a 'Hall Royd Junction' 2013-2023 email: Hall Royd Junction
7 Portobello Close, Chesham, Bucks. HP5 2PL, UK
tel: +44 (0)7513 412880