
Hall Royd Junction: the prototype
Hall Royd lies east of Todmorden Station, over Stephenson's viaduct which defines the northern edge of the town centre, crossing the modern bus station. The junction has moved eastwards during its life, the planned changes first appearing on the 1894 1:2500 scale Ordnance Survey map. The 'new works' took in an area between the site of the modern Hall Royd Road bridge and the mouth of Millwood Tunnel. The western gable-end of the more recent L&YR signal box was located approximately where the original Hall Royd box was located, and box itself sat astride the original level crossing site.
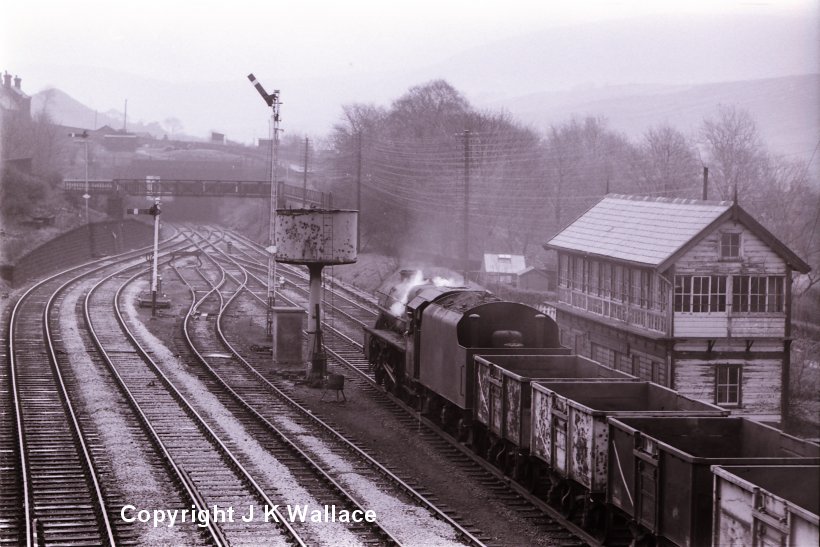
Copyright: J K Wallace, all rights reserved 2013
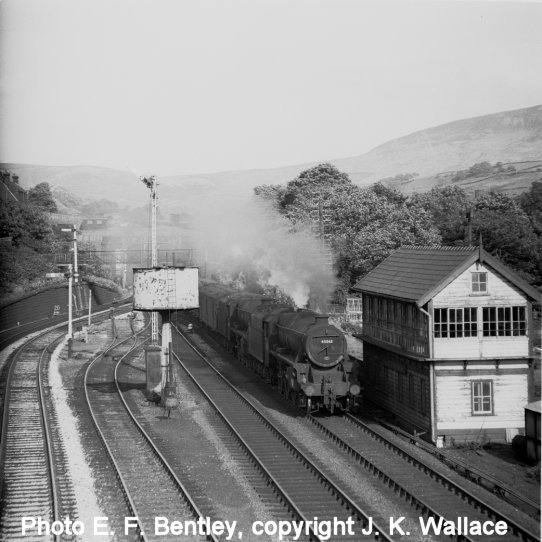
Black 5s 45062 (9J Agecroft) + an unknown class member pass through Hall Royd Junction, Todmorden with 3M30, the 07.50 Heaton – Red Bank empty vans. Taken at 17.30 on Saturday 28 August 1965. Points to note are the gallows signal by the mouth of Millwood Tunnel, and the boarding-up of the lower windows on the signal box end gable, which at this time now extends to both small 6-window panels. The Down Starter on the Burnley line still has a wooden signal post.
Also of great interest is possibly the last appearance of the gallows signal. Many thanks to Chris Littleworth who has now been able to shed light on the interim changes that took place in late 1965. These saw two signals replaced by a coloured light at the entrance to Millwood Tunnel. The multiple aspect coloured light had two feathers, so left feather lit was for access to the up loop beyond Hall Royd Road bridge; light only up main to Todmorden and right feather for Copy Pit. So the modern PN315 would have originally had another set of feathers.
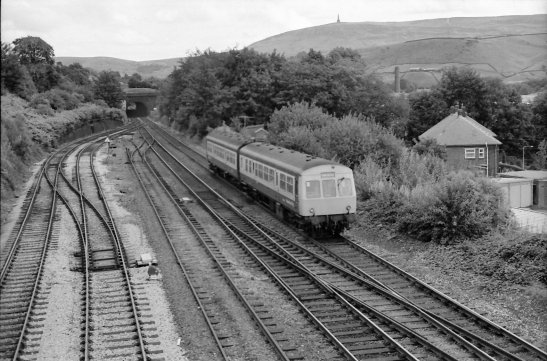
Hall Royd Junction was once a busy place with both Up and Down loops, holding sidings on the down (Yorkshire) side, and with a regular flow of coal from Yorkshire being sent either to East Lancashire via Copy Pit and Rose Grove, or via Rochdale and towards Manchester. In this view taken on 5 September 1984, the Up Manchester loop and siding (behind the photographer) had already been taken out, leaving the remains of the Down loop, which is now acting as the exit from the civil engineer's fan of sidings. With the closure of the box, and control transferred to Preston, to new trailing cross-overs were laid, one on the Burnley lines, and one - replacing the original cross-over - being laid in slightly west of the original, and so placing it the other side of the exit from the down loop (removed by 22 March 2014 and replaced by the a new crossover on Todmorden viaduct - as had the remains of the down loop). This arrangement gave some flexibility when reversing trains that had terminated at Hebden Bridge, allowing the reversal to take place on either set of running lines. The pillars that once supported the Lower Laithe House footbridge, which crossed the line just before the physical junction, are lost in the undergrowth on both sides of the line. The undergrowth was starting to get out of hand in steam days, but only recently has Network Rail carried out a major clearance job to reveal a number of features that have not seen the light of day for many years!
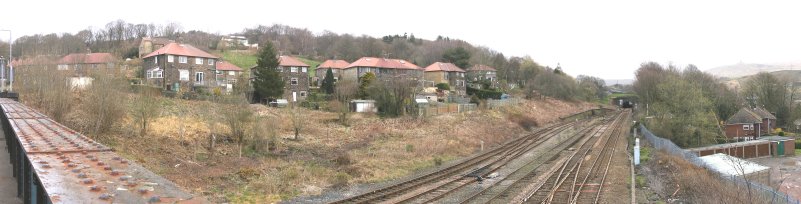
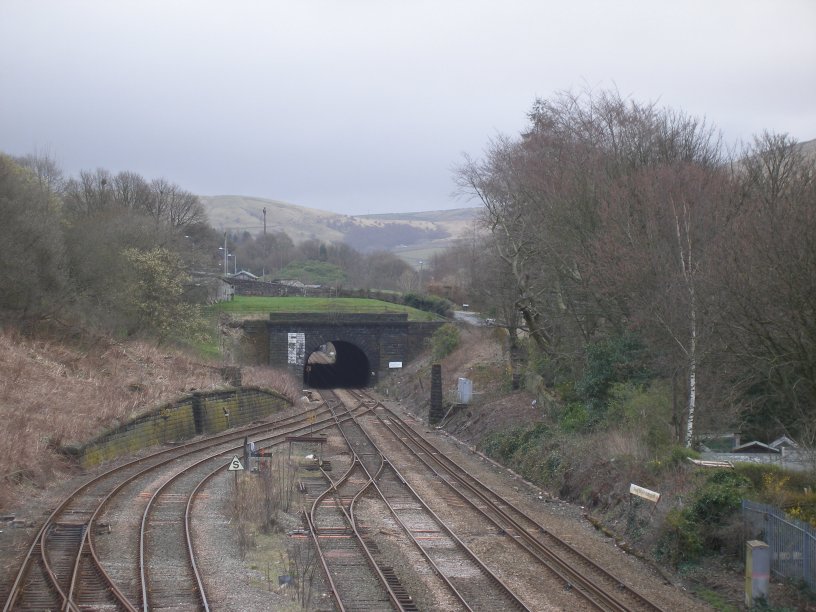
The second shot shows Hall Royd Junction looking eastwards on 19 April 2013 showing the recent clearance work undertaken by Network Rail. The pillars of the Lower Laithe House footbidge are now apparent: there is one incorporated in the boundary wall; one next the track and one incorporated in the retaining wall.
Copyright: J K Wallace, all rights reserved 2013

Copyright: J K Wallace, all rights reserved 2013
Copyright J K Wallace All rights reserved. Original photographer J C H Leeson
Stanier Black 5 45203 passes Hall Junction signal box in 1968 with a down empty mineral working...
...and then a second shot with Black 5 45203 about to enter Millwood Tunnel in 1968 with its empty coal wagons.
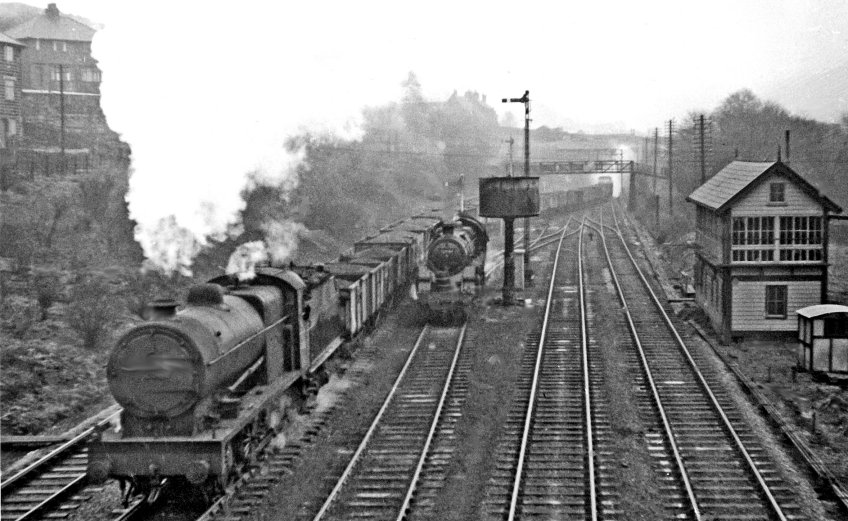
View eastward on a wet day, towards Sowerby Bridge, Wakefield etc.: ex-L&Y Calder Valley main line. The Class J coal train has emerged from Millwood Tunnel and is turning onto the line to Burnley and Copy Pit, passing a BR Standard 4MT 4-6-0 75049. At its head is a typical LMS Fowler 7F 0-8-0, No. 49566 (built 1929, withdrawn 9/57). The lines on the right go to Todmorden, Rochdale and Manchester. This looks like a running in turn - could this be 75049's first outing having just been constructed at Horwich?

Copyright Gavin W Morrison
I am very grateful to Gavin Morrison to reproduce here this shot of Riddles 'WD' class 2-8-0 No. 90181 with a westbound coal freight taking the Copy Pit route at Hall Royd Junction, Todmorden on 14 June 1961. Footbridge 109 is still in situ, just above the water tank. Although the bridge looks like it is painted a dark grey or even black, close up shots show it to be in fact standard mid-grey but caked in soot. One possible reason why it was in such a poor physical state when BR removed it c. 1973. In the original shot it is possibly to see the girder work of the gallows signal above bridge 109, and silhouetted against the tunnel mouth. The vegetation is interesting here in that it bushes out dramatically in the summer but dies down in the winter, giving a totally different appearance. Pictures of this location can be dated by the boarded in lower windows on the gable nearest the camera: this is the intermediate period with only the left hand windows replaced by boarding. The telegraph pole on the left hand side of the photo is of note, as the main 'run' can be seen running down the right hand side of the line, behind the signal box. Finally, despite the early date of 1961, the water tank appears to have been de-commissioned, and there are no signs of the bags, actuating levers for the valves within the tank or their operating chains appear to be present. Yet the fire devil is still present, and three trains will still be booked into the loop as late as 1965, with one due to stop for pathing purposes, so in theory able to carry our 'loco duties' whilst held there .
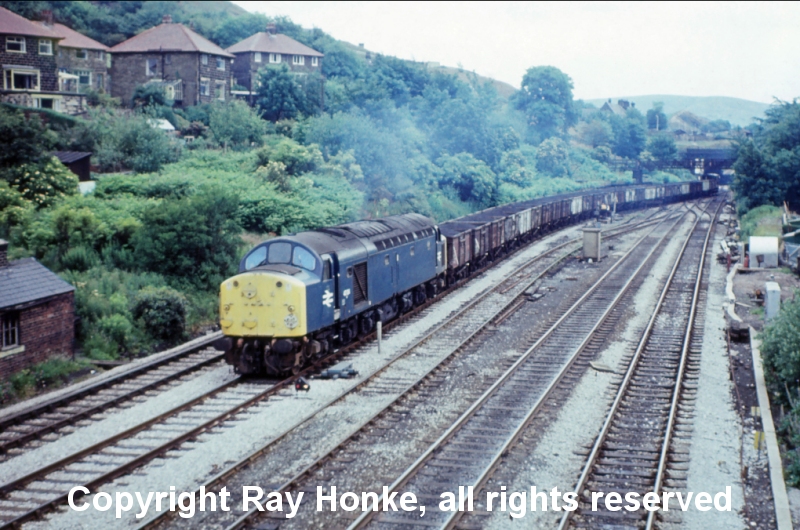
In October 1973 the Preston Power Signaling scheme was extended over Copy Pit to Hall Royd and onto Eastwood. The semaphore signals, water tank and signal box were subsequently removed. However this photo taken by Ray Honke is of particular interest as it shows the Permanent Way hut, the fogman's hut, the reverse curve in the Down loop and footbridge 109 were all still in situ on 28 June 1974 when EE Class 40 40124 headed a mineral trains towards Copy Pit and Rose Grove, and grateful to Ray for permission to share it here.
Photographer Graham Roose; Copyright JK Wallace
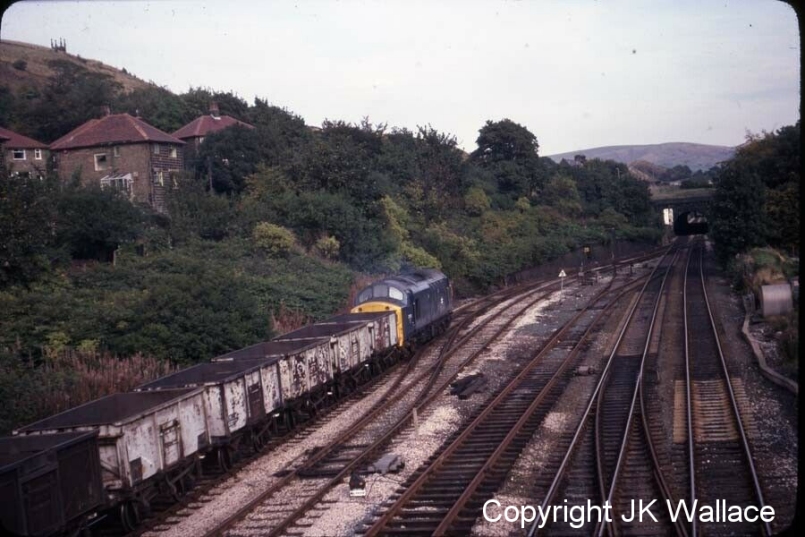
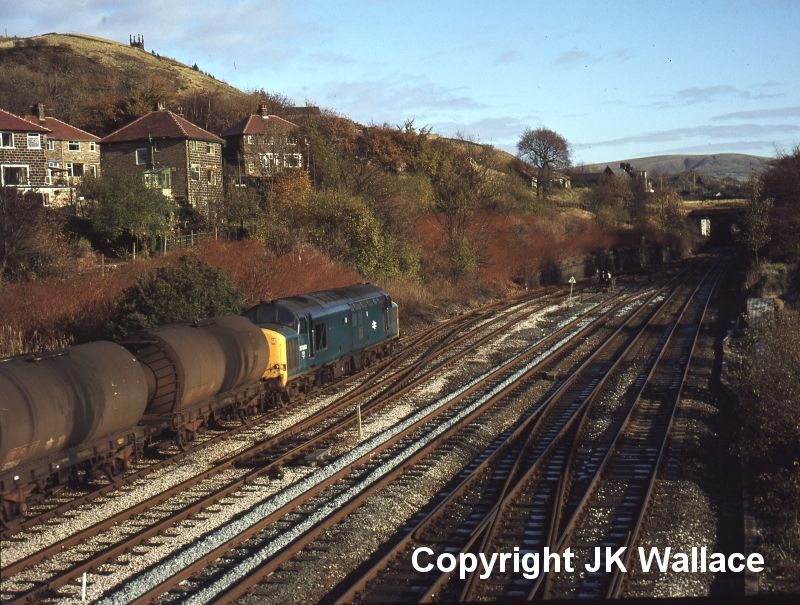
BR Class 37 37103 passes Hall Royd Junction heading eastwards with an empty mineral train from Rose Grove on 8 October 1979. Note that by this time footbridge 109 has been removed.
Photographer Graham Roose; Copyright JK Wallace
English Electric Class 37 37252 passes Hall Royd Junction with empty oil tanks on 12 November 1980.
Copyright JK Wallace, all rights reserved
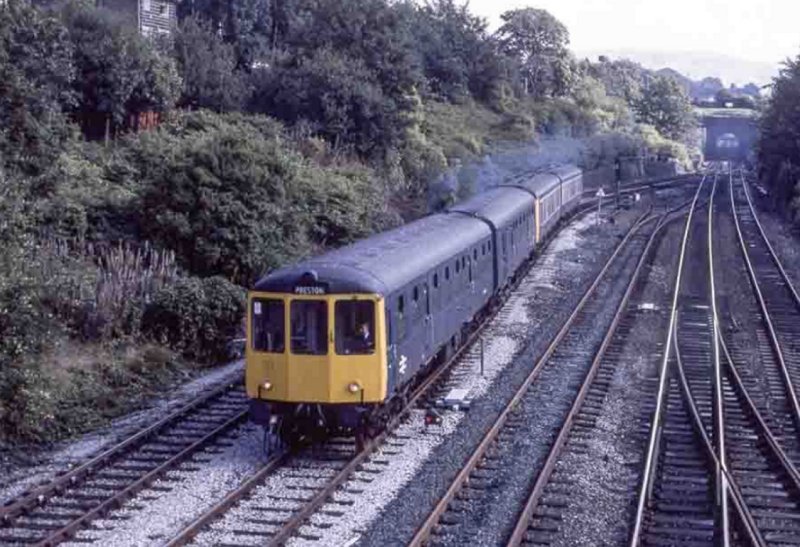
A Class 104 2-car DMU heads a four car consist heading for Copy Pit and Preston on 1 October 1984.
Copyright J K Wallace, all rights reserved
Hall Royd looking east on 19 April 2013. At some stage the wiggle in the down loop round the water tank has been straightened, but pieces of rail have been removed from the point at the end of the loop so that it is now a trap point rather than ending in the buffer stop. The sign naming the junction can be seen to the right of the formation, although the post nearest the camera no-longer seems to be vertical.
Copyright J K Wallace, all rights reserved
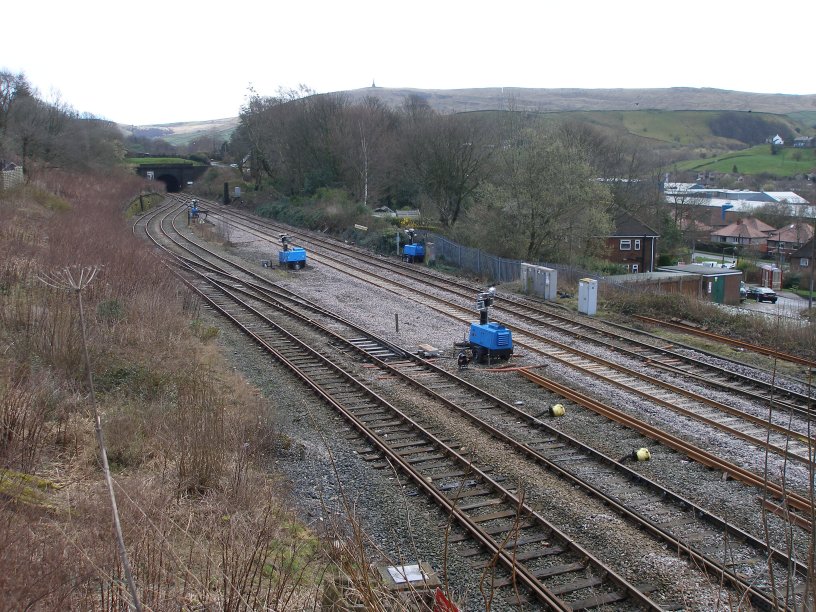
Not quite a 'Present' view of Ben Brooksbank's shot, but the changes over the last 60 years in this area are apparent. This is Hall Royd looking east on Sunday 23 March 2014 taken from the bridge and showing the crossover on the L&Y main removed, with plain line inserted on the down line. The DCE siding and frame have been removed, leaving just the buffer stop in splendid isolation. The blue lighting rigs are evident. Future generations will wonder why the Burnley (East Lancashire) line deviates to the left in the way that it does. Gone is the signal box, the asbestos lamp hut, Lower Laithe House footbridge (Bridge 109?), the down loop, the water tower, fog man's hut, the gallows signal by the tunnel mouth (late 1965), the four down Home signals (1973) - and all the shunting signals. In fact, there isn't a single signal in the view - remarkable for a junction. Note the flange oilers on the Burnley line just before the sharp curve round to Stansfield Hall starts - the current thinking is to oil the flanges on the rolling stock, rather than having the PW gang travelling to remote locations to top them up. Chris Littleworth has a 1965 plan that shows a watercrane on the down Burnley line, just where the deviation to the left is at its greatest, but there appears to be no photographic evidence of this otherwise very handy feature.
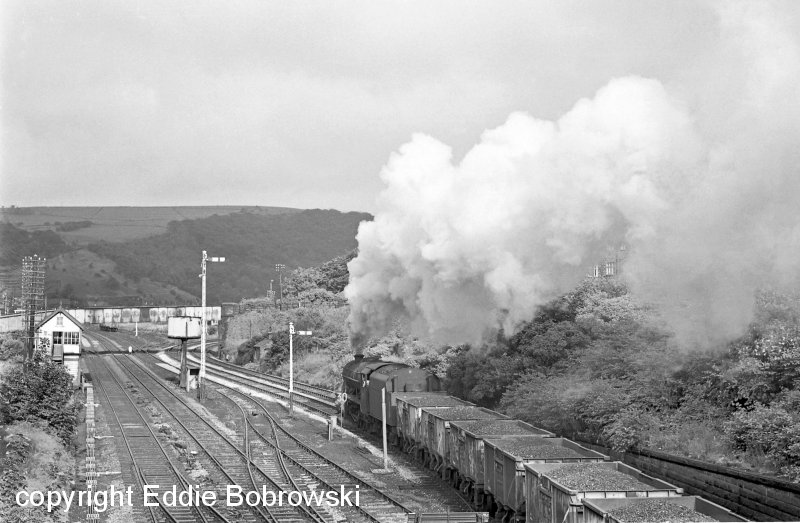
Copyright Eddie Bobrowski, all rights reserved
This late steam era shot by Eddie Bobrowski taken almost at the end of steam in 1968 shows Stanier 8F 48519 heading for Stansfield Hall and Rose Grove via Copy Pit. This is one of only two known photograph taken (see below) from the private occupation bridge 109, and I am grateful to Eddie for permission to publish it here. Eddie notes: "It was Sunday 23 June 68, the 4am Mirfield to Padiham extra during a work-to-rule". Apparently David Rodgers has a photo of the same train, taken from nearer the signal box looking back towards the bridge - in which case, it will no doubt show Eddie standing on it!!
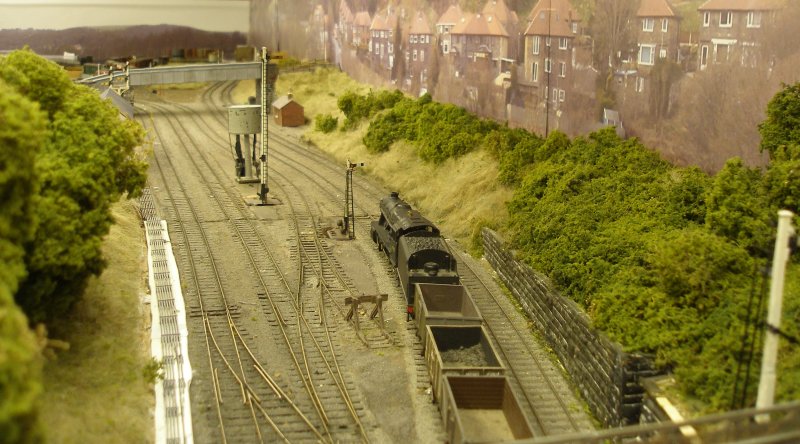
The comparative model shot shows that the trees clearly need clipping back, as they are currently obscuring the signal box.
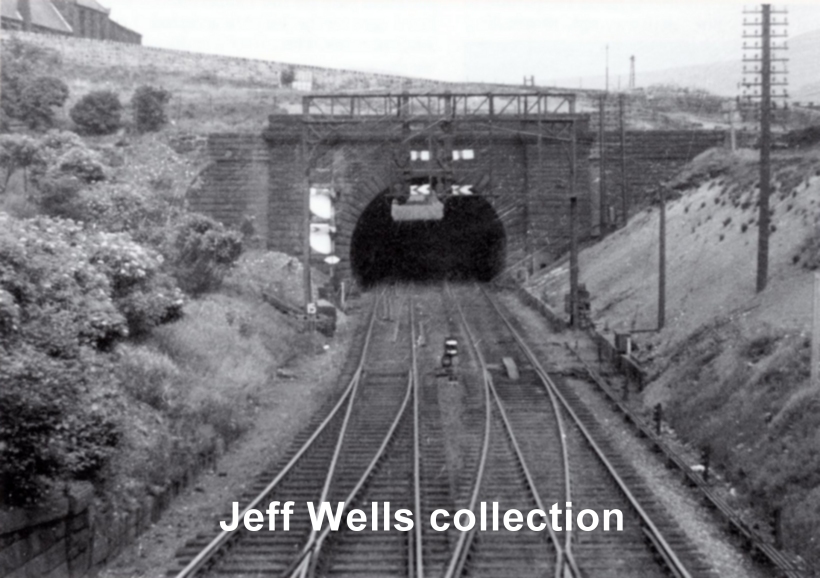
Jeffrey Wells collection
I am very grateful for to Jeff Wells for permission to reproduce the above the image: the only one so far found taken from mid-way across occupation footbridge 109 looking towards the mouth of Millwood Tunnel.
As previously noted, photos taken from bridge 109 are rare, partially because it was not a public right of way, and secondly by the early 1960s there were noticeable gaps in the plank decking.
The photo features the LNWR gallows signal (signals 36, 38 and 39) which would have been erected after the LYR and LNWR merged in 1922. Both this signal gantry and the home and distant signals (signals 9 & 10) to the left of the tunnel mouth still feature the original lower quadrant arms which where converted to standard upper quadrant arms at a later, but unknown date.
The lack of any hen houses above the tunnel suggest that this is a pre-WW2 image, as the hen houses were erected in two phases after 1939.
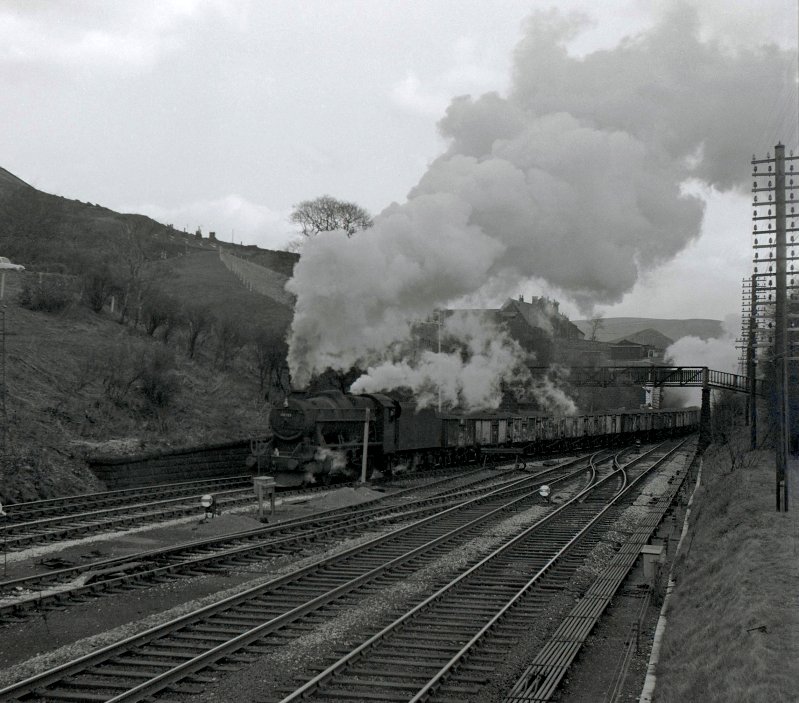
Photograph courtesy and copyright of rail-online.co.uk
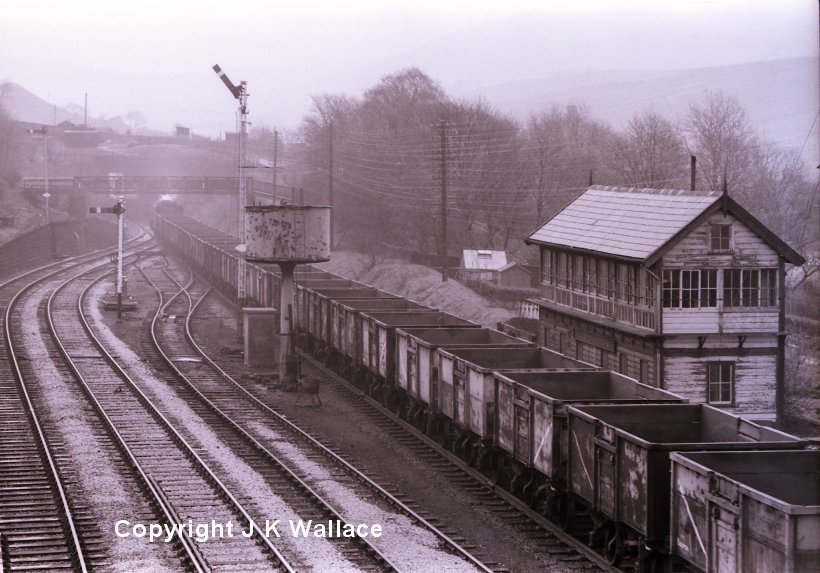
A word of thanks to Tony at rail-online for his assistance in making this image available. This is sometime after August 1965 as the gallows signal at the mouth of Millwood Tunnel. Chris Littleworth also suggests that there were other changes made at the same time: the single slip that the tenth wagon is passing over was replaced with a plain diamond whilst the bracket signal behind the photographer controlling access to the Up loop was also removed at this time. Both signals were replaced by a colour light with a pair of feathers mounted on top at the other end of Millwood Tunnel. Eventually all signals were swept away at this location when Preston power box took control in 1973 - the signals are now much further back from the actual junction. The footbridge provided access for Lower Laithe House (to the right) to their land above the railway, and was also removed in 1973. The photograph was taken from the steps of Hall Royd signal box - compare it to the one that appeared in the BR House magazine below. Above the first few wagons can be seen the outlines of a building: then a school; now the offices of an undertaker. Just behind the tenth wagon can be seen the home and distant signal controlling access to Millwood Tunnel for down (Leeds-bound) trains. The distant is linked to an intermediate block signal located between Hall Royd and Eastwood, and allied with Hall Royd, so allowing more trains to be pathed into this two-track section.
From the same location, but with the camera turned 180 degrees, finds BR Standard 70013 passing Hall Royd signal box with an eastbound excursion (1Z75) on 28 October 1967. According to the Six Bells Junction Website, this was organised by Manchester Rail Travel Society and Severn Valley Railway Society, and started and finished at Birmingham New Street. There were seven legs of this tour, this being the third, and the first of the two that 70013 would power. 70013 picked the train up at Manchester Victoria, and then headed to Castleton, Rochdale, Hebden Bridge, Brighouse, Bradley Wood Jnc, Huddersfield, Penistone, Wadsley Bridge, Sheffield Victoria, Woodburn Jnc, Rotherham Central, Swinton, Mexborough, Doncaster, Hare Park Jnc, Turners Lane Jnc and Normanton. The photo is the only seen so far by your Webmaster to show the eastern end of the Permanent Way hut. This shows a door and window at this end of the hut, meaning that it was effectively double ended. Although difficult to clearly establish from the photo,it looks as if the hut might have been extended, with the chimney marking the original end. It seems unlikely that the original gable wall was knocked through, and so potentially the extension was used by another team, such as the Signals and Telegraph. There is photographic evidence of the hut having a telephone line, which might favour this suggested usage.

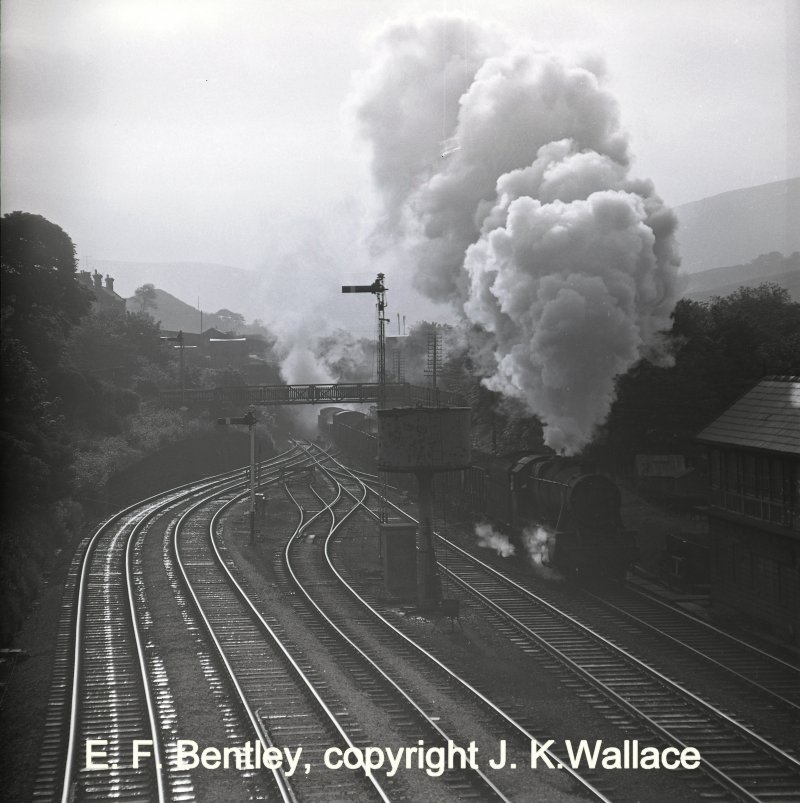
Photographer Eric F Bentley, copyright JK Wallace
8F-hauled westbound freight passes Hall Royd signal box as it approaches Todmorden at 07.10am on Saturday 10 June 1967.
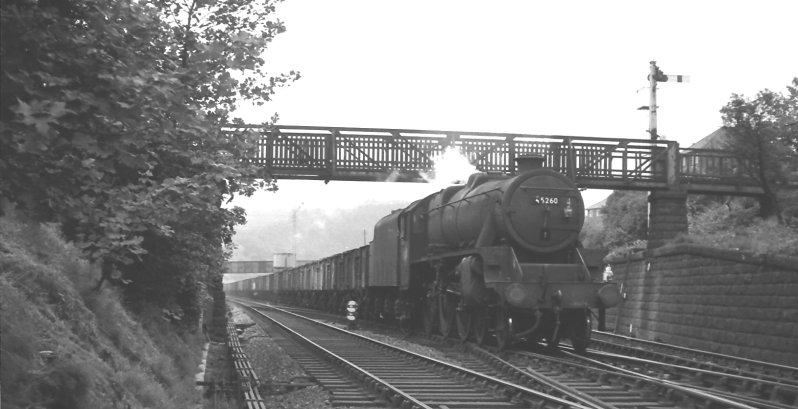
Photo P. Eckersley, Copyright: J K Wallace, all rights reserved 2013
Black 5 45260 enters the Hall Royd Junction crossing with a returning train of empty coal wagons bound for Yorkshire in 1965. Passing under Lower Laithe House footbridge, then still in situ. Of particular note is the square wooden post of the Burnley line signal post, and access platform below the signal arm; the footbridge appears to be painted standard infrastructure grey, but the light between the girders gives the suggestion that some of the decking is missing. There appear to be no photographs actually taken from this bridge. Behind the photographer was located the Hall Royd gallows signal, which appears to have been removed c. 1964, being replaced with a colour light splitting signal (?) at the Halifax-end of Millwood Tunnel.
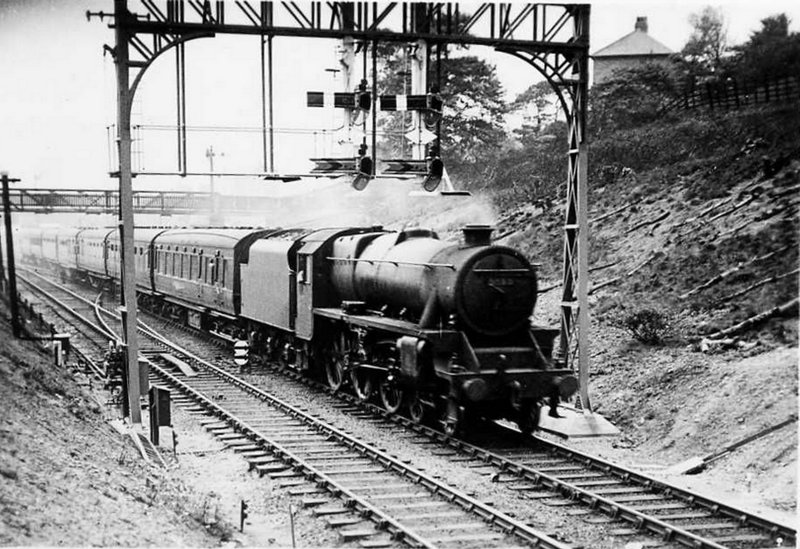
Photograph Arthur R Wilson; J. K. Wallace collection
A little further down the line both in distance and in time. This is Hall Royd Junction with a Manchester - York service pulled by Stanier Black 5 5212 and passing under the gallows signal. The date is around 1937, as 5212 was new to Low Moor shed in November 1935, and the photo is thought to be pre-1939. The final layout at Hall Royd was commissioned, along with the signal box, in 1904. It can therefore be assumed that the signals initially sported the 1889 Raynar Wilson arms, but signal 5 in the back ground has the later 1912 arm, which it kept until the early 1950s. The gallows signal, however, is sporting four LNWR corrugated steel arms. Other known LNWR arms on the Calder Valley controlled the exit from the Down bay platform at Brighouse. At the merger of the L&YR and L&NWR in 1922, the Horwich signalling department was quickly transferred to Crewe. It is reported that the patterns also went, but clearly when total replacement was required, rather than a repair, stock Crewe items were used. The location over the tracks would expose them to the exhaust from heavy uphill trains and this may have meant that these signal arms required more regular replacement. Certainly by the early 1950s these arms had been replaced with short Upper Quadrant arms. The gallows was one of the first signals to be replaced by a colour-light signal in late 1965, the new signal being at the other end of Millwood Tunnel (behind the photographer). The L&YR had planned to quadruple much of its main line, and in the 1897 Act it obtained consent to quadruple the line eastwards from Todmorden Station (which would have included the viaduct). However with the 1922 merger, the new entity now had six tracks across the Pennines, and as traffic levels had already peaked, the need for an extra pair of tracks was fast receding. The area to the right of the Black 5 shows the extent to which the LYR had acquired the land needed, with the boundary fence passing close to the house seen to the right of the gallows signal. However, the land clearance to the right may in preparation for its sale, as later photographs show much of the embankment side sold off, with a fence level with the top of the loco's smoke box. Footbridge 109 in the background appears to have smoke deflectors to protect the underside of the decking: these are missing from later photos.
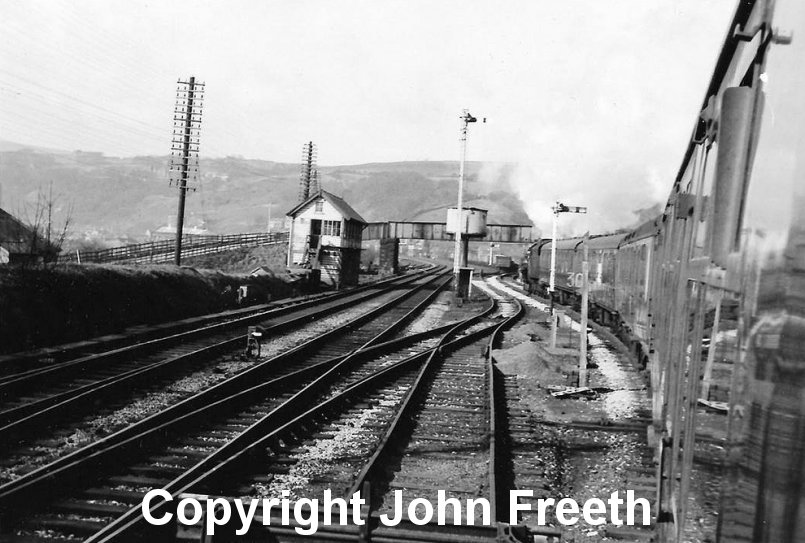
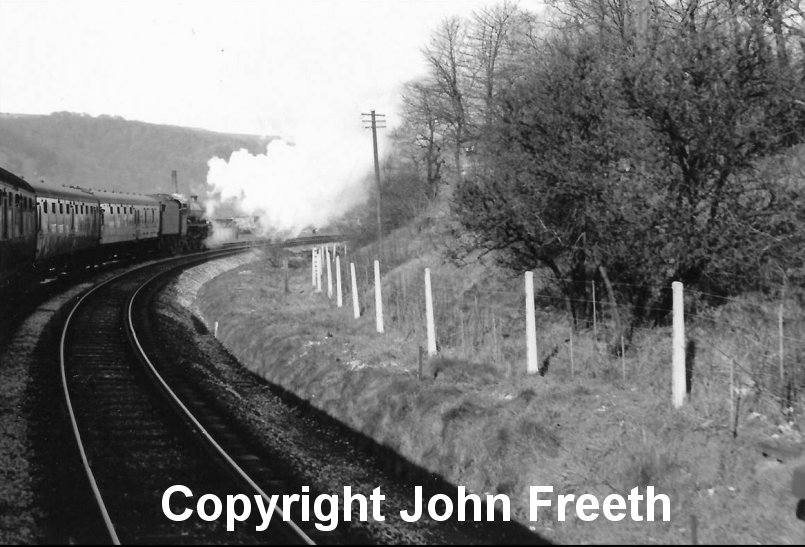
Photographer and copyright John Freeth, all rights reserved
Stanier Jubilee 4-6-0 45593 'Kohlapur' (now preserved) takes the Copy Pit line at Hall Royd Junction with an Easter Bank Holiday Monday (27 March 1967) excursion from Bradford Exchange to Blackpool (1X15).
Photographer and copyright John Freeth, all rights reserved
45593 'Kolhapur' takes the curve between Hall Royd Junction and Stansfield Hall Junction on the climb to Copy Pit with 1X10 a Bradford to Blackpool excursion train on Easter Monday 27 March 1967.
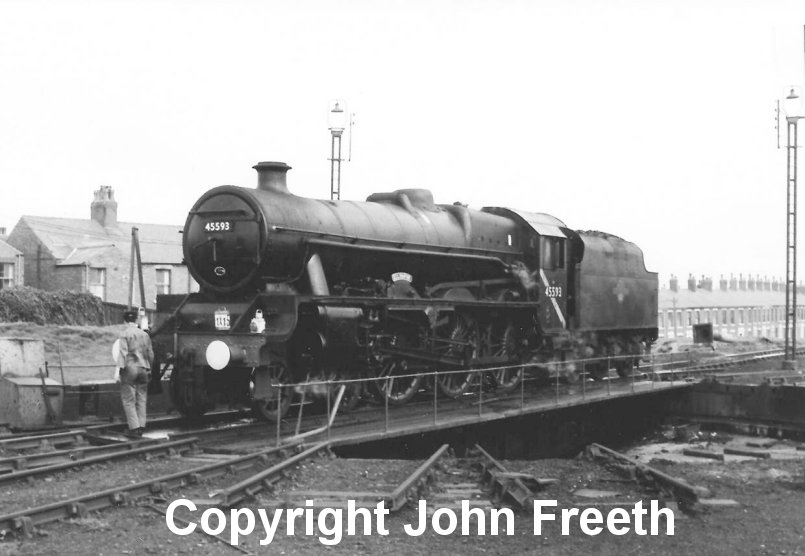
Photographer and copyright John Freeth, all rights reserved
Jubilee 45593 'Kolhapur' on the turntable at Blackpool North Shed on Easter Monday 27 March, 1967 after arrival with the 1X15 excursion from Bradford and returned later the same day.
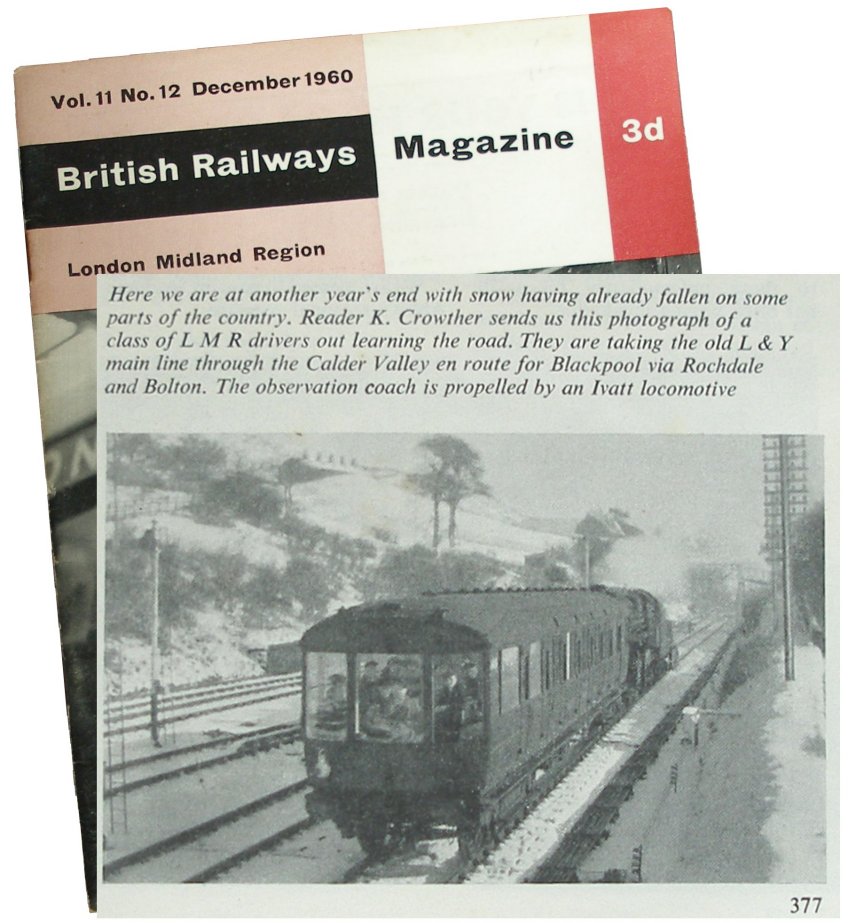
The 'British Railways Magazine London Midland Region, Volume 11 Issue 12 dated December 1960 featured a photo by railwayman K Crowther from the steps at Hall Royd Junction signal box. The York Motive Power Deport instruction carriage is described as containing LMR drivers out learning the road. It suggests they are travelling to Blackpool via Rochdale and Bolton. It is assumed that the photo was taken in the early months of 1960, and that K Crowther was the signalman on the day.Clive Mortimor on the RMWeb group has noted that a photo of this carriage appears in Backtrack Volume 10 No. 4 dated April 1966 on page 184. This shows a Gresley teak vehicle numbered DE 320765 and lettered MOTIVE POWER DEPT, YORK on the side. It sports a yellow end. The photo is dated 6 August 1965 and the car is being propelled by Fairburn tank 42204, at, err, York Station.
As the photo is black and white, it would be easy to assume that the livery was a faded maroon. However David Ford has located a photo of the carriage in his father's collection showing it being pulled by a Class 46 in the down direction at Pilmoor which is posted on the RMWeb thread. The photo is dated April 1968 and the carriage looks to be painted matt black, and latterly it had yellow warning panels. The 'control trains' formed of Gresley stock that existed in the 1960s are also reported to have been painted black.
Hugh Llewllyn suggests this is a GNR Gresley 52'6" First Saloon No.807 built at Doncaster 1912, which became LNER No.4807 and was refitted as an Engineer's Saloon, BR No.DE320765 as pictured at York Shed, 07/67, although the coach is clearly on a 61' 6" underframe. The photo on Wikipaedia shows it with Gresley compound bolster bogies.
The paperback edition of Michael Harris' 'LNER Carriages' hoiwever shows this to be a standard LNER Diagram Book (Dia 23). For those interested in modelling this car, there is a kit in the old Cooper-Craft range, or one of the new Hornby carriages. The livery appears to be Engineering Department black. The car also appears to be double-ended, so allowing training runs in both directions without having to turn it.
.jpg)
Finally, a shot of the bracket signal towards the end of its days, as featured in the October 1964 issue of 'Modern Railways' Page 252. This contains a photograph by C. T. Gifford of a Class 110 DMU passing the Up bracket signal at Hall Royd Junction controlling access to the Up loop. This is an ex-LYR post with upper quadrant arms, and, to date, is the only photograph so far discovered showing the signal in such detail. Note the profusion of guy wires tethering it to Mother Earth. The S&T man is happily perched on the tie-bar tethering the two wooden dolls (or posts). Note that the distant arm for the main line is motor worked from Todmorden East, while the arm for the loop appears to be fixed.
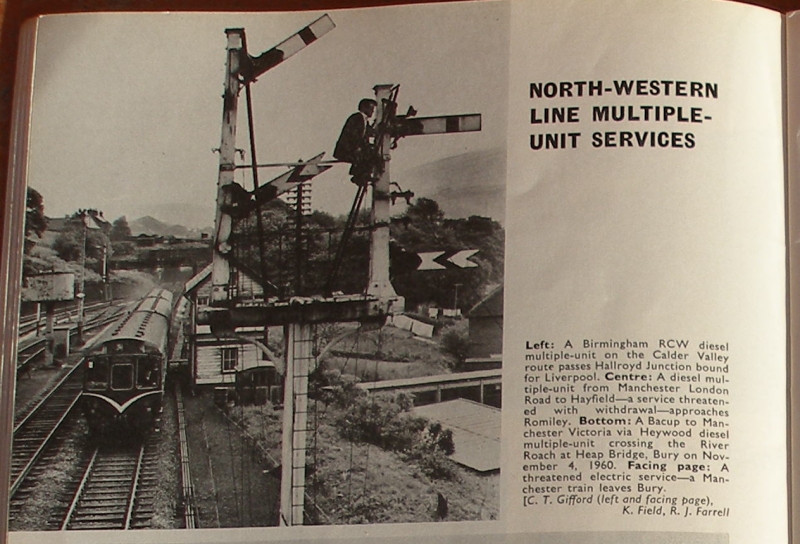
Modern Railways October 1964. If C T Gifford or his estate would like to make contact, we would very much appreciate the opportunity to feature the original photograph.

Copyright J K Wallace, t/a 'Hall Royd Junction' 2013-2023 email: Hall Royd Junction
7 Portobello Close, Chesham, Bucks. HP5 2PL, UK
tel: +44 (0)7513 412880