
Hall Royd Junction: Ordnance Survey mapping
The earliest map of Hall Royd so far located is the 1:2500 scale 1894 map. As luck would have it, this shows the original layout, before the layout was updated and the physical junction moved eastwards.
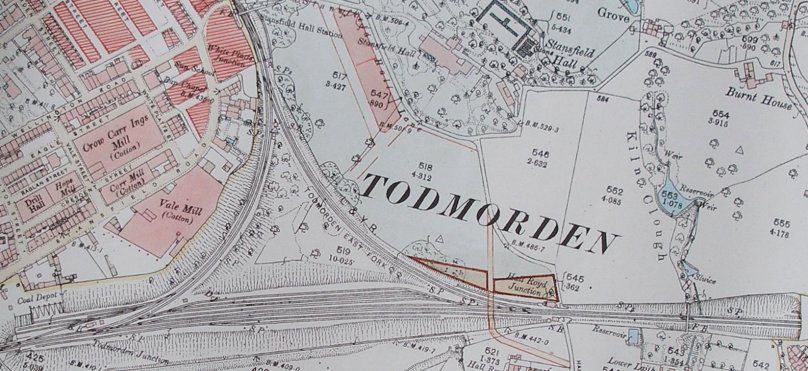
Reproduced from the Ordnance Survey Map 1894
Points of interest. The map has been revised immediately before the L&Y remodelled the junction, and replaced the level crossing with the current bridge. It shows the proposed bridge and road realignments. See below for detail. There is a siding on the northern side of the Burnley line immediately before Hall Royd level crossing. This siding does not seem to be connected to the running line. However, examination of the 1852 1:1,056 scale OS Town Planning map shows that this appears to be a catch siding for run-aways from Copy Pit. There is a trailing point in the Copy Pit direction leading onto a diamond crossing which then ends in a siding with its buffer stop next to the Crossing Keeper's house. According to Chris Littleborough the L&YR was a fully interlocked railway from 1881 onwards, and so the signals and points would have been fully connected with the signal box after this time. The Hall Royd level crossing is apparent, as is the location of the original Lower Laithe House footbridge, then only spanning two tracks.
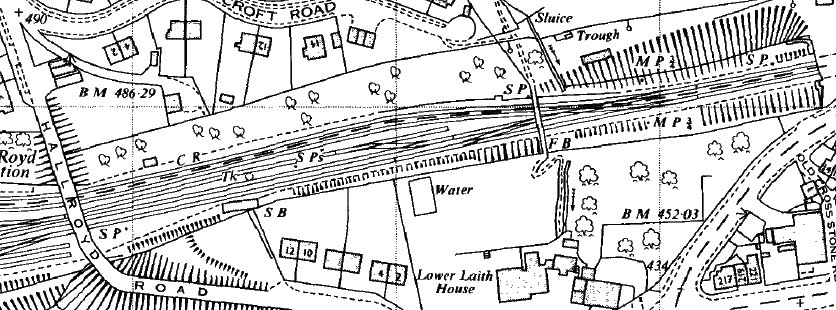
Ordnance Survey 1:2500 scale 1963
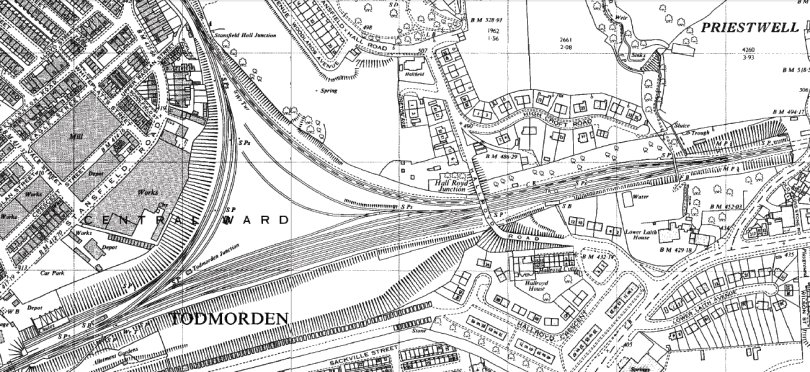
Copyright Old Maps and Ordnance Survey (Crown Copyright 1963) www.old-maps.co.uk
The 1963 map makes an interesting comparison. The track that today leads down from High Croft Road to a garage perched above the railway, is, in fact, the old course of Hall Royd Road heading towards the site of the old level crossing. The three Down signal posts are marked protecting the lines approaching the tunnel, as is the Advanced Starter by the tunnel mouth, and the water tank servicing the Down Goods Loop. What is missing is the gallows signal gantry controlling the actual junction for Up trains - see below for extract.
However, the Up bracket signal that controlled access to the Up goods loop is shown (next to the 'Y' in 'Hall Royd Road' on the bridge. Off the Up loop was a siding, and this was protected by a signal cantilevered over the siding so it could be see by drivers entering toe loop. However this signal is not marked on the map although it would have co-existed with the siding, which is shown.
Around the mouth of Millwood Tunnel and towards the sluice from Kiln Clough can be seen two huts marked. Shirley Wiszniewski has written that these were hen huts leased by her Grandfather from the railway, until the lease was given-up in 1971. Access to the huts was through the gate off Cross Stone Road. Shirley notes that the sheds were standing at the point the lease was surrendered.
The concrete panelled garages have yet to appear behind the signal box.
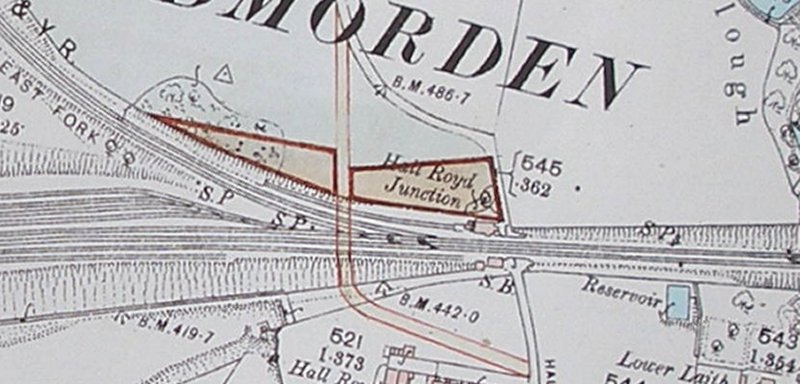
Reproduced from the Ordnance Survey Map 1894
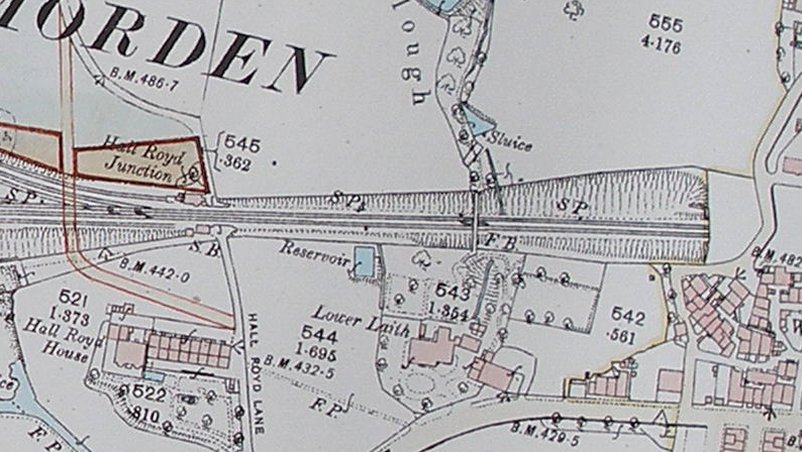
Reproduced from the Ordnance Survey Map 1894
It can be seen that the site of the level crossing was through the middle of the later signal box site, with the approaching road passing through the site of the modern concrete garages that are at right angles to the line. The tail from the Up sidings ends with a buffer stop by the original signal box, which was by the level crossing, on the Up (south) side of the line. It would appear this siding was cut back to terminate on the Todmorden side of the new bridge, although an opening was created for it, but so far there is no evidence it was actually used. Until more recent times, that is, as it now forms Network Rail's access road to the trackside and relay rooms. The siding next to the crossing seems oddly placed for loco stabling purposes, as it would not have facilitated banking locos for Copy Pit but might have been used to pop the odd wagon into for local unloading. The map shows two parcels of land either side of the new bridge alignment which are possibly either being purchased or sold by the railway at this time.
The culvert carrying the stream from Kiln Clough under the railway can be clearly seen. Likewise the two home signals on each track are clearly marked, as is what appears to be a cross-over actually under the footbridge. This appears to be a facing cross-over, and it is not clear which signals control it, there being no signal posts shown immediately east of Millwood Tunnel.
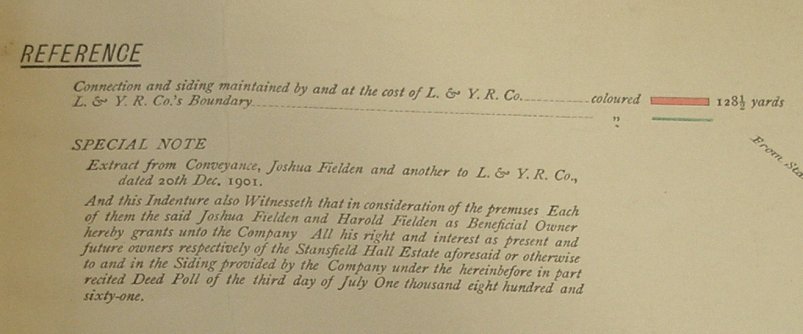
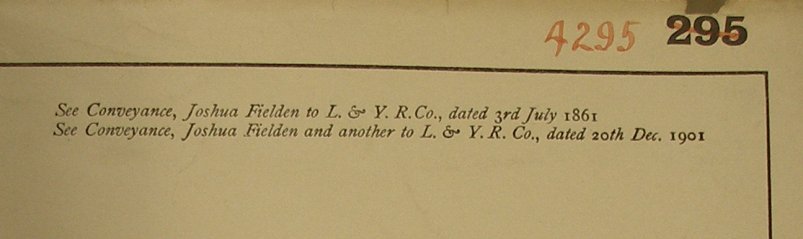
Joining a society can have enormous advantages, and the Lancashire & Yorkshire Railway Society should be mentioned as a unique resource both in terms of its membership and the materials it has amassed over the years. At their Spring Meeting in Todmorden in March 2014 the Lancashire and Yorkshire Railway's Private Siding Diagram book Volume 201 - 300 was on display. This is a superbly produced book showing the ownership and boundaries of all the private sidings on the L&Y system. Each page is printed, and then the sidings presumably individually coloured in by hand in each bound volume.
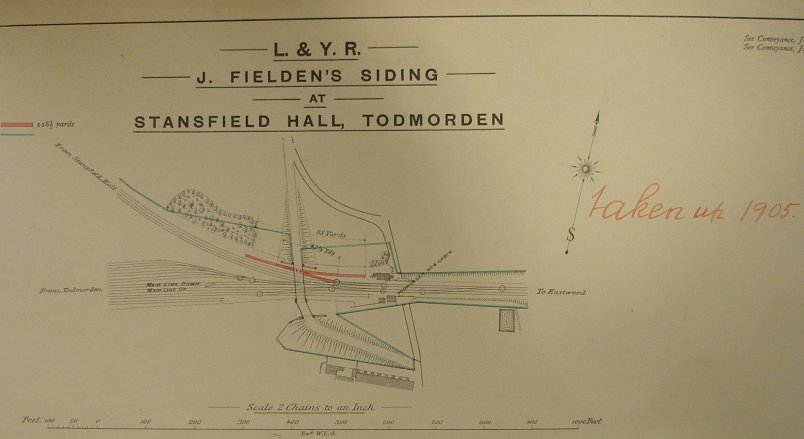
This shows that the junction was not moved immediately after Hall Royd Road bridge was built, and that the space now occupied by the two tracks to Copy Pit was actually created for J Fielden's siding, which had been retained. The old road to the level crossing has been retained, presumably to maintain access to the siding from Stansfield Hall. Today, a modern garage maintains the start of this access. Next to and above the crossing jeeper's cottage can be seen the gate that allowed access to the siding. The purpose of this siding had always been something of a mystery but now its purpose is explained. However it is a trailing connection, and its proximity to the junction would have ensured that working it would have blocked both down lines and the level crossing. Presumably wagons were gravitated or worked by a rope in and out of the dead end. They certainly didn't keep a 'Pug' handy.
In 2013 Network Rail cleared much of the undergrowth from this area, revealing the of the old road and siding access.
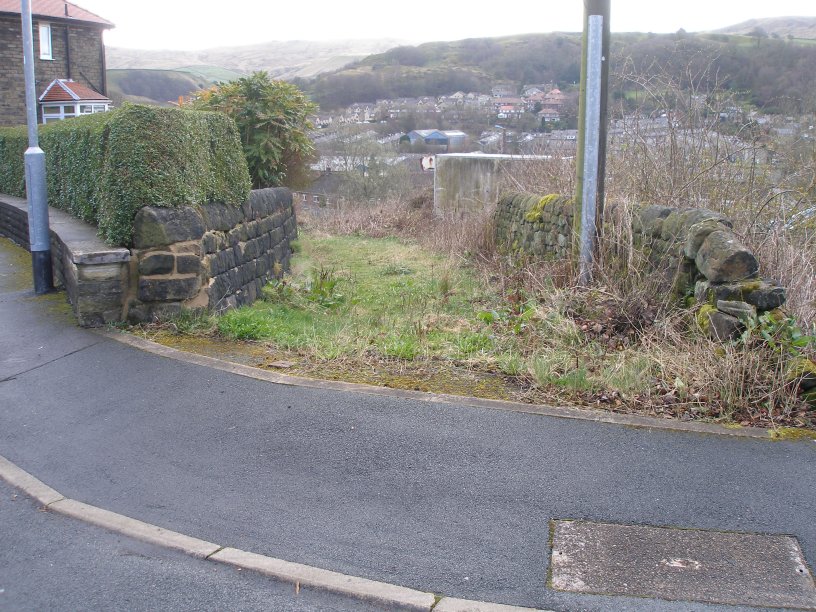
Modern day access to the original alignment of Hall Royd Road.
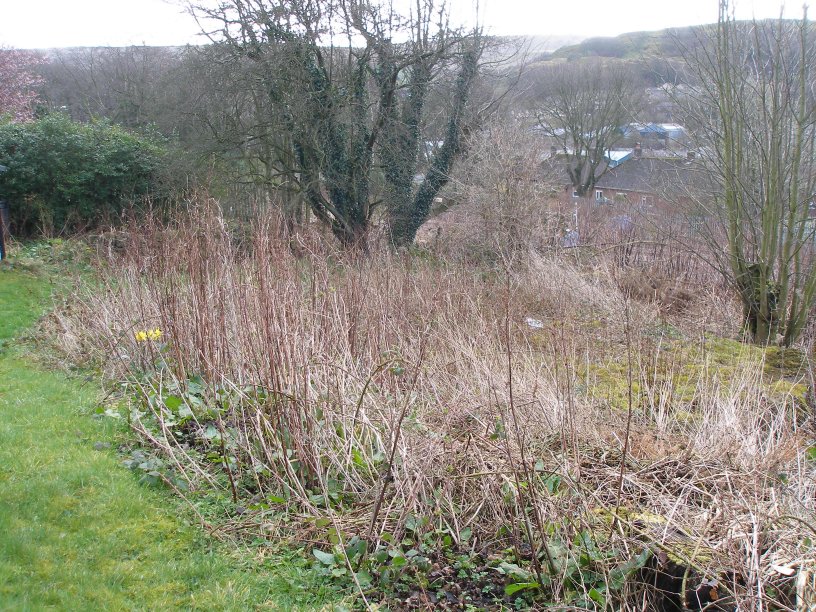
This is the bend approximately half way down, with the modern day garage out of sight to the left.
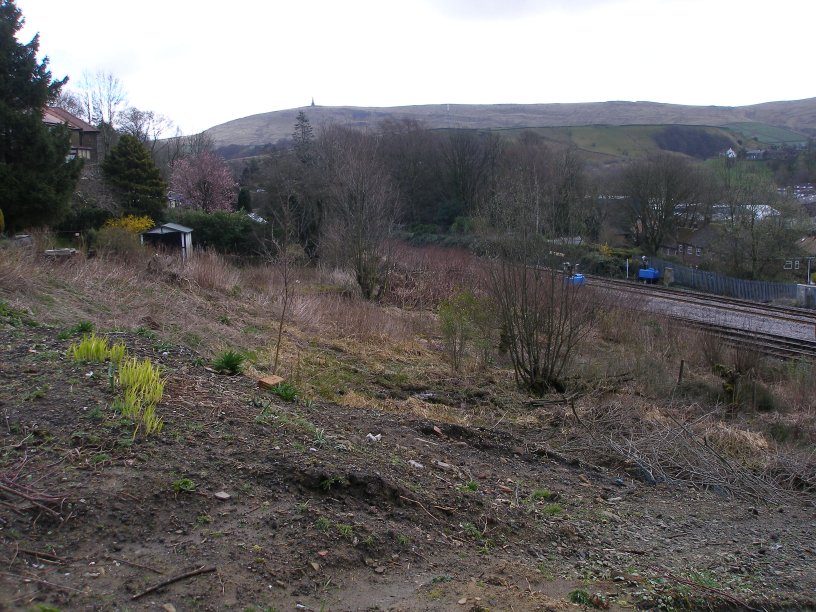
The old road alignment starts at the top left where the fencing is, tracks down to the garage and then descends to the railway. Study of the Private Siding diagram (above) and this photograph suggests that the brick built permanent way hut was probably located on the foundations of the original crossing keeper's house. Daniel Birch has kindly allowed the reproduction of the photo showing the original crossing from the Birch Collection, and it appears below.
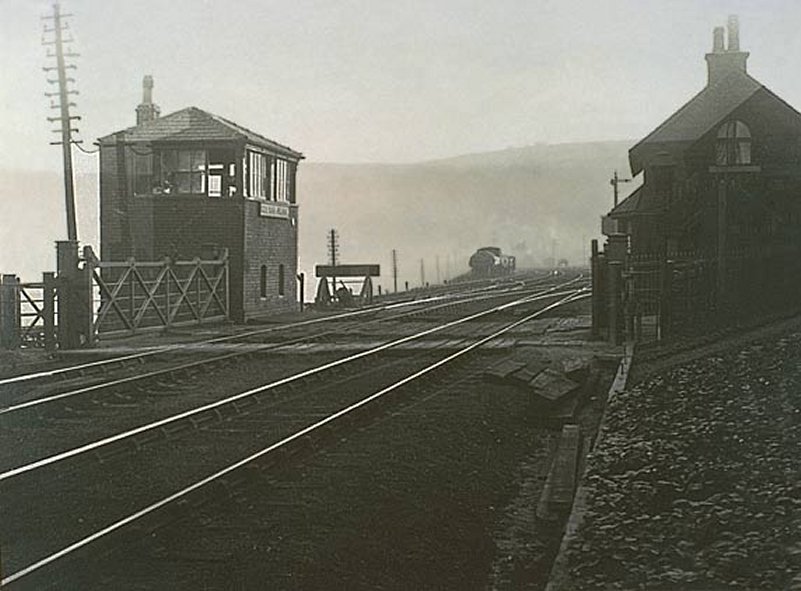
Image courtesy of the Roger Birch Collection.
Extract from 1963 1:2500 scale Ordnance Survey map
Copyright Old Maps and Ordnance Survey (Crown Copyright 1963) www.old-maps.co.uk

In September 1973 Hall Royd Signal Box was closed, and the points and signals switched over to Preston Power Signal Box (PSB). The above map is extracted from the British Railways (London Midland Region) Preston Signal Box East Lancashire Re-Signalling Stages A. B and C; Special Notice 1330G. The document was issued under the direction of D. M. Howes, Chief Operating Manager.
Stage C applied to Copy Pit and Hall Royd Junction and between Smithy Bridge and Hebden Bridge which were switched over between Sunday 21 October 1973 and Monday 22 October 1973. Boxes to be abolished were Stansfield Hall, Summit West and Todmorden. This latter would be Todmorden East, the West box having closed earlier.
The notice notes that the direction of lines between Copy Pit and Hall Royd Junction was to be changed, the up main line to become the down East Lancs. line and the down line to become the up East Lancs. line.
For Hall Royd, the notice states: "The signal box will be abolished and all signals taken away. The Hall Royd DCE Siding frame will control movements between the sidings and the down L & Y line."
Of interest, the trailing cross-over on the L&YR line is still shown between the junction and the DCE turnout, whereas it now lies to the west of the DCE turnout. The stub of the Todmorden curve is shown as an 'Engine Spur', with a facing cross-over to facilitate returning bankers being switched directly into it. Although the current relaying plans envisaged this surviving turnout being heavily fettled, it is now to be replaced to give a better transition on to the newly relaid curve. Click here to see a photo of this section of the Preston PSB board has kindly been provided by Simon Foster.
The fate of the gallows signal had also been something of a mystery as it had disappeared before the rest of the manual signalling was scrapped. Many thanks to Chris Littleworth who has now been able to shed light on the interim changes that took place in late 1965. These saw two signals replaced by a coloured light at the entrance to Millwood Tunnel. The multiple aspect coloured light had two feathers, so left feather lit was for access to the up loop beyond Hall Royd Road bridge; light only up main to Todmorden and right feather for Copy Pit. So the modern PN315 would have originally had another set of feathers.

Copyright J K Wallace, t/a 'Hall Royd Junction' 2013-2023 email: Hall Royd Junction
7 Portobello Close, Chesham, Bucks. HP5 2PL, UK
tel: +44 (0)7513 412880